7 Pink-And-Pastel Halloween Treats For Soft Color Palettes
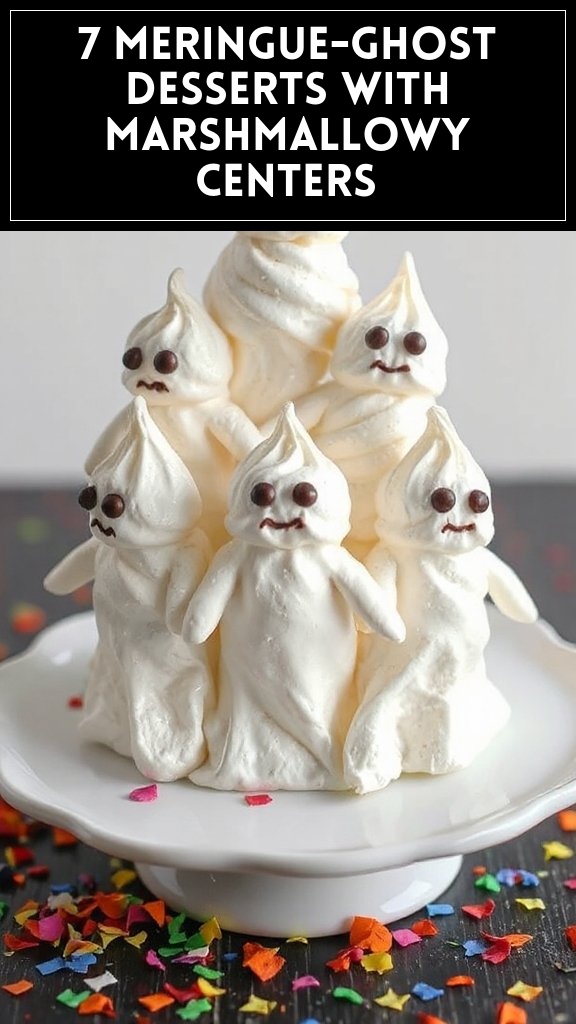
Strawberry Ghost Meringues
Strawberry Ghost Meringues are delightful, airy confections that add a whimsical touch to your Halloween festivities. These light meringues shaped like little ghosts not only look adorable but also burst with a subtle strawberry flavor. Perfect for those with a sweet tooth, they can serve as a charming treat for kids and adults alike!
Preheat the Oven: Start by preheating your oven to 200°F (93°C). Line a baking sheet with parchment paper to prevent the meringues from sticking.
Make the Meringue: In a clean, dry mixing bowl, add the egg whites. Using an electric mixer, beat the egg whites on medium speed until they become frothy.
Add Cream of Tartar: Once frothy, add the cream of tartar to the egg whites. This helps stabilize them and will guarantee that your meringue is fluffy and holds its shape.
Incorporate Sugar Gradually: Increase the mixer speed to high, and slowly add the granulated sugar, one tablespoon at a time. Continue to beat until the egg whites reach stiff peaks and the mixture is glossy.
Mix in Flavorings: Gently fold in the strawberry puree and vanilla extract with a spatula. Be careful to maintain the volume of the meringue as you mix.
Prepare for Piping: Transfer the meringue mixture into a piping bag fitted with a round tip. If you’d like to add faces to your ghosts, you can dip a toothpick into black food coloring for the eyes and mouth.
Pipe the Ghost Shapes: Pipe small dollops of meringue onto the prepared baking sheet, shaping them into ghost-like figures. Make sure to leave some space between each meringue, as they will expand slightly while baking.
Bake the Meringues: Place the baking sheet in the preheated oven and bake for about 1.5 to 2 hours, or until the meringues are completely dry and can be easily lifted off the parchment. They should be crisp on the outside.
Cool and Decorate: Once done, turn off the oven and let the meringues cool completely inside. After cooling, you can use the toothpick and food coloring to draw ghostly faces.
Serve and Enjoy: Gently remove the meringues from the parchment paper and arrange them on a serving platter. Enjoy your cute and spooky Strawberry Ghost Meringues as a delightful Halloween treat!
Pastel Pumpkin Cookies
Pastel Pumpkin Cookies are a delightful twist on traditional Halloween treats. These soft and chewy cookies are flavored with warm spices and coated in pastel-colored frosting, making them both a tasty and visually appealing addition to your Halloween spread. Perfect for parties or as a fun baking activity with kids, these cookies are sure to become a seasonal favorite!
Preheat the Oven: Begin by preheating your oven to 350°F (175°C). Line two baking sheets with parchment paper, ensuring that the cookies won’t stick during baking.
Mix Dry Ingredients: In a medium-sized bowl, whisk together the all-purpose flour, baking soda, ground cinnamon, ground nutmeg, and salt. Set this mixture aside as you will incorporate it later.
Cream Butter and Sugars: In a large mixing bowl, beat the unsalted butter, granulated sugar, and brown sugar together with an electric mixer until the mixture is light and fluffy, about 3-5 minutes.
Add Egg and Pumpkin: Add the vanilla extract and the egg to the creamed butter and sugars, mixing well to combine. Then, carefully fold in the pumpkin puree until evenly incorporated.
Combine Wet and Dry Ingredients: Gradually add the dry ingredient mixture to the wet ingredients, mixing on low speed until just combined. Avoid over-mixing, as this can make the cookies tough.
Scoop Cookie Dough: Use a cookie scoop or spoon to drop rounded tablespoons of dough onto the prepared baking sheets, spacing them about 2 inches apart.
Bake the Cookies: Place the baking sheets in the preheated oven and bake for 12-15 minutes, or until the edges are lightly browned and the centers appear set.
Cool the Cookies: Once baked, remove the cookies from the oven and let them cool on the baking sheets for about 5 minutes. Then, transfer them to a wire rack to cool completely.
Decorate with Frosting: Once the cookies have cooled, decorate them with pastel-colored icing. Feel free to get creative with different colors and patterns!
Add Sprinkles (optional): For an extra touch, sprinkle some festive toppings on the frosted cookies.
Serve and Enjoy: Arrange your beautifully decorated pastel pumpkin cookies on a platter and share them with friends and family. Enjoy the lovely combination of flavors and the seasonal spirit!
Prepare Your Baking Dish: Start by lining an 8×8-inch square baking dish with parchment paper, ensuring you leave some overhang for easy removal later. Lightly grease the parchment paper with non-stick spray or butter to prevent sticking.
Melt Marshmallows: In a large saucepan over low heat, melt the mini marshmallows and softened butter, stirring continuously until they are completely melted and smooth.
Add Flavoring: Once the marshmallows are melted, stir in the cotton candy-flavored gel (or extract) until well combined. If desired, you can also add a drop or two of pink food coloring to enhance the pastel look.
Combine with Cereal: Remove the saucepan from heat and quickly add the crisped rice cereal to the melted marshmallow mixture. Stir gently until the cereal is fully coated and the mixture is well combined.
Incorporate Candy Corn: Fold in the candy corn, making sure to spread them evenly throughout the mixture. Be careful not to crush the candy corn as you mix.
Press Into Baking Dish: Transfer the mixture into the prepared baking dish. Use a spatula or your hands (lightly greased to prevent sticking) to press the mixture down firmly and evenly across the bottom of the dish.
Cool and Set: Allow the mixture to cool at room temperature for about 30 minutes or until it is set. If you’re short on time, you can place it in the refrigerator to speed up the cooling process.
Cut Into Squares: Once set, remove the treats from the baking dish using the parchment overhang. Cut into square or rectangular pieces, depending on your preference.
Garnish (Optional): If desired, sprinkle some edible glitter on top of the treats for a fun, festive touch.
Serve and Enjoy: Your Cotton Candy Candy Corn Treats are now ready to be served! Place them on a festive platter and watch them disappear as guests indulge in their sweet, nostalgic flavors.
Raspberry Pink Velvet Cupcakes
Raspberry Pink Velvet Cupcakes are a charming twist on the classic red velvet cake, perfect for Halloween or any festive occasion. These moist and colorful cupcakes are infused with raspberry flavor, offering a delightful balance of sweetness and tartness. Topped with a luscious cream cheese frosting, they are not only visually appealing but also irresistibly delicious.
Preheat the Oven: Begin by preheating your oven to 350°F (175°C). Line a standard cupcake pan with cupcake liners to prepare for baking.
Mix Dry Ingredients: In a large mixing bowl, whisk together the all-purpose flour, granulated sugar, cocoa powder, baking powder, baking soda, and salt until well combined.
Combine Wet Ingredients: In a separate bowl, mix together the vegetable oil, eggs, buttermilk, raspberry puree, and vanilla extract. Add the red food coloring to achieve the desired pink hue, adjusting as necessary.
Combine Wet and Dry Mixtures: Gradually pour the wet mixture into the dry ingredients. Stir gently with a spatula or whisk until just combined. Be careful not to overmix; a few lumps are okay.
Fill the Cupcake Liners: Using a measuring cup or an ice cream scoop, fill each cupcake liner about two-thirds full with the batter. This will help guarantee they rise evenly without overflowing.
Bake: Place the cupcake pan in the preheated oven and bake for 18 to 22 minutes, or until a toothpick inserted into the center of a cupcake comes out clean. Keep an eye on them to avoid overbaking.
Cool the Cupcakes: Once baked, remove the pan from the oven and let the cupcakes cool in the pan for 5 minutes. Then transfer the cupcakes to a wire rack to cool completely.
Prepare the Cream Cheese Frosting: While the cupcakes are cooling, make the frosting by beating together 8 oz. of softened cream cheese, ½ cup of softened butter, and 4 cups of powdered sugar until smooth and creamy.
Frost the Cupcakes: Once the cupcakes are cool, use a piping bag or a spatula to frost each cupcake generously with cream cheese frosting.
Decorate and Serve: Optionally, garnish the tops with fresh raspberries or sprinkles for an extra touch. Serve and enjoy your Raspberry Pink Velvet Cupcakes as a delightful treat for any Halloween gathering or special occasion!
Lavender Spiderweb Cheesecake
Lavender Spiderweb Cheesecake is an enchanting dessert that beautifully combines the creamy richness of cheesecake with a delicate lavender flavor, making it a stunning centerpiece for any Halloween gathering. The cheesecake is adorned with a spiderweb design, adding a playful yet eerie touch to this pastel treat. With a buttery crust and a silky smooth filling, this dessert is guaranteed to impress your guests during the spooky season.
Ingredients
Quantity
Graham cracker crumbs
1 ½ cups
Granulated sugar
½ cup
Unsalted butter, melted
½ cup
Cream cheese, softened
24 oz.
Granulated sugar (for filling)
1 cup
Sour cream
1 cup
Eggs
3 large
Lavender extract
2 teaspoons
Heavy cream
1 cup
Powdered sugar
1 cup
Purple food coloring
1-2 drops
Dark chocolate (for web)
4 oz.
Instructions:
Prepare the Crust: Preheat your oven to 325°F (163°C). In a mixing bowl, combine the graham cracker crumbs, ½ cup of granulated sugar, and the melted butter. Mix until the crumbs are evenly coated. Press the mixture firmly into the bottom of a 9-inch springform pan to form an even layer. Bake the crust for about 10 minutes, then remove it from the oven and let it cool.
Make the Cheesecake Filling: In a large mixing bowl, beat the softened cream cheese until smooth and creamy, using an electric mixer on medium speed. Gradually add the 1 cup of granulated sugar and continue to beat until well combined.
Add Other Ingredients: Mix in the sour cream, eggs, and lavender extract one at a time, making sure each is fully incorporated before adding the next. Scrape down the sides of the bowl as needed to guarantee an even mixture.
Bake the Cheesecake: Pour the cheesecake filling into the cooled crust, smoothing the top with a spatula. Bake for 50 to 60 minutes or until the center is set but slightly jiggly. Turn off the oven and leave the cheesecake inside for an additional 1 hour to cool gradually and prevent cracking.
Chill the Cheesecake: Remove the cheesecake from the oven and let it cool at room temperature for about an hour. Cover it with plastic wrap and refrigerate for at least 4 hours or overnight for best results.
Prepare the Spiderweb Topping: Once the cheesecake is fully chilled, whip the heavy cream with the powdered sugar until stiff peaks form. If desired, add a couple of drops of purple food coloring to tint the whipped cream. Spread it evenly over the cheesecake.
Create the Spiderweb: Melt the dark chocolate in a microwave-safe bowl in 30-second intervals, stirring until smooth. Using a piping bag or a zip-top bag with a corner snipped off, drizzle the melted chocolate over the whipped cream in a spiral pattern. Use a toothpick or skewer to drag through the chocolate, starting from the center outward to create a spiderweb design.
Serve: Carefully remove the sides of the springform pan, slice the cheesecake, and serve. Enjoy this festive Lavender Spiderweb Cheesecake with friends and family!
Marshmallow Boo Bites
Marshmallow Boo Bites are fun, festive, and absolutely adorable Halloween treats that are perfect for parties or as a sweet surprise for trick-or-treaters. These bite-sized marshmallow delights are dipped in white chocolate and decorated to look like cute little ghosts, making them a playful addition to your Halloween festivities. They’re quick and easy to make, requiring minimal ingredients and time, which will leave you with plenty of time for other spooky preparations!
Prepare Your Workspace: Begin by laying out a sheet of parchment paper on a baking tray. This will serve as the cooling surface for your dipped marshmallow ghosts. If you are using lollipop sticks, insert them into the bottom of each marshmallow for easy handling.
Melt the Chocolate: In a microwave-safe bowl, place the white chocolate chips. Microwave in 20-30 second intervals, stirring in between, until the chocolate is melted and smooth. Be certain to not overheat; otherwise, the chocolate may seize.
Dip the Marshmallows: Holding each marshmallow by the stick, dip it into the melted white chocolate, confirming it is fully coated. Lift it out and gently shake off any excess chocolate before placing it on the parchment paper.
Add Ghost Eyes and Mouths: While the chocolate is still wet, use the mini chocolate chips to create the eyes and mouth of the ghosts. Gently press them into the chocolate to confirm they stick. If you want, you can also sprinkle coconut flakes on top for a spooky effect.
Let Them Set: Allow the Marshmallow Boo Bites to sit at room temperature until the chocolate hardens. If you’re short on time, you can place them in the refrigerator for about 10-15 minutes to speed up the hardening process.
Serve and Enjoy: Once the chocolate has fully set, your Marshmallow Boo Bites are ready to be served! Arrange them on a festive platter and enjoy the delight on your guests’ faces as they indulge in these tasty Halloween treats.
Creamy Berry Halloween Bark
Creamy Berry Halloween Bark is a delightful and visually stunning treat that combines the rich texture of melted chocolate with the vibrant colors of seasonal berries. Perfect for Halloween gatherings or as a sweet gift, this easy-to-make dessert brings together creamy white chocolate, fresh fruit, and a festive sprinkle of Halloween-themed toppings, creating a delicious and eye-catching bark.
Prepare Your Workspace: Line a baking sheet with parchment paper, making sure it covers the entire surface for easy removal of the bark later.
Melt the White Chocolate: Place the white chocolate chips in a microwave-safe bowl. Heat in the microwave at 20-30 second intervals, stirring in between until the chocolate is fully melted and smooth. Be careful not to overheat to avoid seizing.
Spread the Chocolate: Once the chocolate is melted, pour it onto the prepared baking sheet. Use a spatula to spread it evenly into a rectangle about ¼ inch thick. Make certain it is spread out uniformly for even cooling.
Add the Berries: While the melted chocolate is still warm, evenly sprinkle the freeze-dried mixed berries over the surface. Gently press them down slightly to make sure they stick to the chocolate.
Sprinkle the Toppings: Add the Halloween sprinkles and optional coconut flakes over the chocolate and berries, decorating it as festively as desired.
Let It Set: Allow the bark to cool at room temperature until it hardens completely. This may take about 1-2 hours. Alternatively, you can place it in the refrigerator for 30 minutes to speed up the process.
Break Into Pieces: Once the bark is set, break it into irregular pieces with your hands or a knife, creating a fun homemade treat.
Serve and Enjoy: Arrange the creamy berry bark on a serving platter or in a festive container for sharing. Enjoy the delicious mix of flavors and the excitement it brings to your Halloween celebrations!