7 Movie-Night Halloween Snack Bars Built For Refills
Creepy Candy Corn Bar
Creepy Candy Corn Bars are a delightful Halloween-themed treat that combines the festive flavors of candy corn with a chewy, cookie-like base. These bars are perfect for gatherings, school parties, or simply to enjoy at home while watching spooky movies. With their vibrant colors and sweet taste, they are sure to be a hit with kids and adults alike!
Preheat the Oven: Preheat your oven to 350°F (175°C). Grease a 9×13-inch baking pan or line it with parchment paper for easy removal.
Prepare the Base: In a large mixing bowl, use a hand mixer or stand mixer to cream together the softened unsalted butter, brown sugar, and granulated sugar until the mixture is light and fluffy.
Add Eggs and Vanilla: Beat in the large eggs, one at a time, incorporating each completely before adding the next. Then, add the vanilla extract and mix until fully combined.
Combine Dry Ingredients: In a separate bowl, whisk together the all-purpose flour, baking powder, and salt. Gradually add the dry mixture to the wet ingredients, mixing just until combined; be careful not to overmix.
Fold in the Candy Corn: Gently fold in the candy corn and white chocolate chips until evenly distributed throughout the batter.
Color the Dough: Divide the batter into two equal portions. In one portion, add a few drops of orange food coloring and mix until you achieve the desired color. In the other portion, add a few drops of yellow food coloring and mix until well combined.
Layer the Batters: Spoon the orange batter into the prepared baking pan and spread it evenly. Then, carefully layer the yellow batter on top, spreading it gently to avoid mixing the two colors together.
Bake: Place the baking pan in the preheated oven and bake for 25-30 minutes, or until a toothpick inserted in the center comes out clean.
Cool and Cut: Once baked, remove the pan from the oven and let it cool in the pan for about 15 minutes. Lift the bars out using the parchment paper (if used) and place them on a wire rack to cool completely. Once cooled, cut them into squares or bars.
Serve: Enjoy your Creepy Candy Corn Bars as a fun and festive Halloween treat! Optionally, you can drizzle additional melted white chocolate on top or sprinkle extra candy corn for decoration.
Ghoulish Guacamole and Chips Station
Ghoulish Guacamole and Chips Station is a fun and interactive dish that’s perfect for Halloween gatherings. This vibrant green dip, made with ripe avocados, is not only delicious but also adds that eerie touch to your spooky spread. Paired with an assortment of colorful tortilla chips, this station will be an attractive hit on your dining table, inviting guests to enjoy this healthy and tasty snack!
Prepare the Avocados: Cut the ripe avocados in half, remove the pits, and scoop the flesh into a medium mixing bowl. Use a fork or potato masher to mash the avocado until it reaches your desired level of creaminess—chunky or smooth.
Add Lime Juice: Squeeze the juice of the lime over the mashed avocado. This not only adds flavor but also helps to prevent the avocado from browning.
Incorporate Flavors: Add the minced garlic, chopped fresh cilantro, and diced jalapeño pepper (if using) to the bowl. Season the mixture with salt and black pepper, folding everything together gently until well combined.
Taste and Adjust: Taste your guacamole and adjust the seasoning if necessary, adding more salt, lime juice, or spices to suit your preference.
Create the Chips Station: Transfer the guacamole to a decorative serving bowl. Place it in the center of your table, and surround it with an assortment of colorful tortilla chips—think vibrant blues, reds, and greens to give a festive touch.
Garnish for Spookiness: For an extra ghoulish effect, you can top the guacamole with additional chopped cilantro, a sprinkle of chili powder, or even edible googly eyes to make your dish more fun and visually appealing.
Serve and Enjoy: Provide small plates or napkins for your guests to take chips and dip into the guacamole. Watch as they enjoy this party favorite at your Halloween celebration!
Now, you are all set for a deliciously spooky snack!
12 (preferably drizzled with orange or green chocolate)
Marshmallow ghosts
12 (large marshmallows, decorated with chocolate eyes)
Candy corn
2 cups
Chocolate eyeballs
1 cup
Gummy worms
1 cup
Caramel popcorn
4 cups
Black licorice
1 cup (cut into small pieces)
Instructions:
Prepare the Base: Start by selecting a large, festive platter or board to serve your spooky sweets. A dark-colored platter will make the bright treats stand out beautifully.
Arrange the Cookies: Begin by placing the assorted Halloween-themed cookies on one side of the platter, creating a vibrant display. Mix different shapes and sizes to make it visually appealing.
Add Chocolate-Covered Pretzels: Next, position the chocolate-covered pretzels next to the cookies. You can arrange them in a fun manner by stacking some pretzels or creating a small pile.
Create a Ghost Section: Arrange the decorated marshmallow ghosts next to the pretzels. You can use toothpicks to secure them if they are unstable or lean them against one another for a ghostly appearance.
Pour in the Candy Corn: Use a small dish or directly pour candy corn onto the platter, filling an empty space. This will add a festive color contrast with its yellow, orange, and white hues.
Scatter Chocolate Eyeballs: Randomly place chocolate eyeballs around the edges and gaps of the platter. Their spooky appearance will add character to your spread.
Incorporate Gummy Worms: Drape gummy worms across the platter, letting them cascade over cookies or curl around pretzels for a slimy yet fun effect.
Add Caramel Popcorn: Pile the caramel popcorn into a small bowl and place it beside the platter or directly scatter it across the platter as an added crunchy treat.
Finish with Black Licorice: Finally, sprinkle the black licorice pieces in various spots on the platter for a dark, spooky touch that complements the other treats.
Serve and Enjoy: Once your platter is beautifully arranged, set it out for guests to enjoy. Encourage everyone to take a little bit of everything, making it a true Halloween treat fest!
With this Spooky Sweets and Treats Platter, your Halloween gathering will certainly be a hit! Enjoy the sweet smiles on your guests’ faces as they indulge in these delightful treats.
Eerie Edible Eye Balloons
Eerie Edible Eye Balloons are a fun, whimsical treat perfect for Halloween celebrations. These playful snacks are made from vibrant, colorful balloons that are actually edible and filled with sweet, gooey goodness. Everyone will love the surprise of biting into these spooky yet delightful creations!
Ingredients
Quantity
Round balloons (food-safe)
6
Gelatin
1 cup (mixed with 4 cups of water, flavored if desired)
Prepare the Gelatin: Follow the package instructions to prepare the gelatin mixture. Mix 1 cup of gelatin with 4 cups of water and allow it to sit until fully dissolved. You can add flavored extracts if you desire a specific taste.
Fill Balloons with Gelatin: Carefully stretch the opening of each round food-safe balloon. Using a funnel, fill each balloon with the gelatin mixture, filling it about three-quarters full. Make sure not to overfill the balloons. Once filled, tie them securely.
Chill the Balloons: Place the filled balloons upright in a cup or small bowl to hold them in place. Refrigerate them for at least 4-6 hours, or until the gelatin is fully set.
Melt the Candy Coating: While the gelatin is setting, prepare the candy melts. Melt them according to the package instructions in a microwave-safe bowl, stirring every 30 seconds until smooth. If desired, add a few drops of food coloring to create fun colors.
Prepare the Coconut Flakes: If you want a more eerie effect, mix unsweetened coconut flakes with a few drops of food coloring to create a spooky look. Use green for monster balloons or a mix of colors for variety.
Uninflate the Balloons: Once the gelatin in the balloons has set, carefully deflate each balloon by gently squeezing it and pulling the balloon away from the gelatin. The gelatin should hold its shape, resembling an eye.
Decorate the Gelatin Eyes: Dip the gelatin eyes into the melted candy coating to cover the top half. Place them on parchment paper to set. Before the coating hardens, add edible candy eyes on top for the signature “eye” look.
Coat with Coconut Flakes: Before the candy coating sets completely, roll or sprinkle the gelatin eye-shaped treats with colored coconut flakes to create a fuzzy effect, making them look extra spooky.
Attach Lollipop Sticks: If you want them on a stick, insert a lollipop stick into the bottom of each gelatin eye before the candy coating completely hardens. This will allow guests to easily pick them up.
Serve and Enjoy: Once everything is set and decorated, display your Eerie Edible Eye Balloons on a spooky platter. They are not only fun to look at but also delicious to eat! Enjoy watching your guests delight in this creepy yet tasty Halloween treat.
Pop the Popcorn: Start by popping 10 cups of popcorn using an air popper or on the stovetop. If using the stovetop, heat a tablespoon of oil in a large pot, add 1/2 cup of kernels, cover, and shake until popping slows down. Once popped, spread the popcorn out on a large baking sheet to cool.
Melt the White Chocolate: In a microwave-safe bowl, add the white chocolate chips. Microwave in 30-second intervals, stirring in between until fully melted and smooth. If you’d like to add color, mix in a few drops of food coloring until you reach your desired hue.
Combine the Ingredients: In a large mixing bowl, combine the cooled popcorn, candy corn, chocolate candies, pretzel pieces, and any other desired add-ins.
Pour the Melted Chocolate: Drizzle the melted white chocolate over the popcorn mixture. Use a spatula to gently toss everything together, ensuring all the ingredients are evenly coated.
Add Sprinkles: While the chocolate is still wet, sprinkle the Halloween-themed sprinkles over the mixture. This will add a festive touch and enhance the look of your Monster Munch Popcorn.
Cool the Mixture: If you’re adding caramel sauce, drizzle it over the popcorn mixture at this point. Spread the popcorn mix back onto the baking sheet and let it cool completely for about 30 minutes. The chocolate will harden, helping to hold the mixture together.
Serve in Style: Once cooled, break up any large pieces of popcorn. Set out a fun decorative bowl or individual cups for guests to enjoy their Monster Munch. You can also create a popcorn bar with additional toppings like gummy worms or chocolate drizzle for guests to customize their treats.
Enjoy this monstrous mix while celebrating the spookiest time of the year!
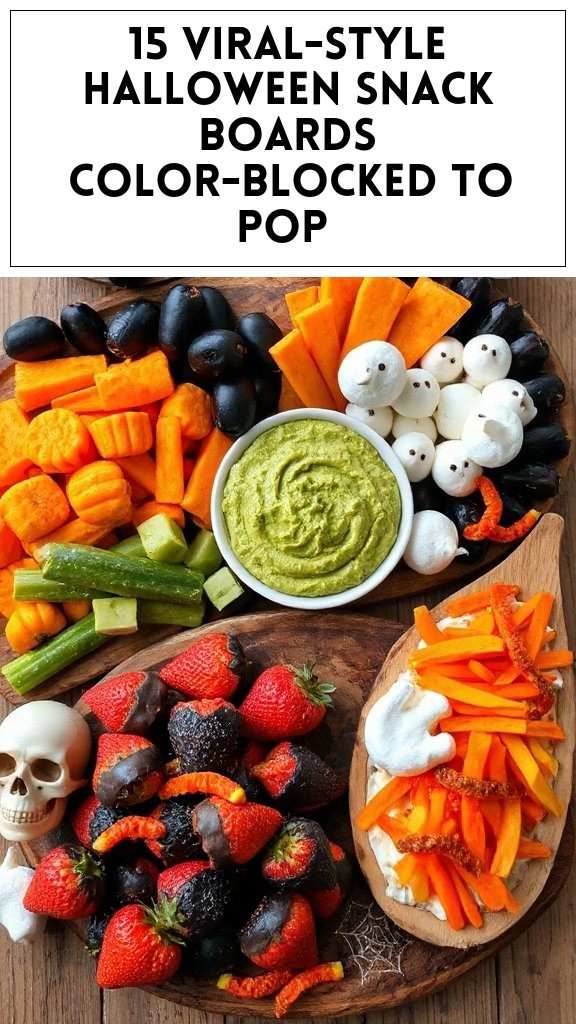
Frightening Fruit and Cheese Platter
A Frightening Fruit and Cheese Platter is a spooky yet delightful treat perfect for Halloween gatherings! This visually appealing display combines playful fruit shapes with an assortment of cheeses to create a festive and nutritious snack that will impress your guests. The combination of flavors and textures not only brings fun to your Halloween celebration, but also adds an exhilarating element to the party.
Ingredients
Quantity
Assorted cheeses (cheddar, gouda, brie)
10 oz (mixed)
Grapes (green and black)
2 cups
Strawberries
1 pint
Sliced apples (with lemon juice to prevent browning)
Prepare the Fruit: Start by washing all your fruit thoroughly. If using apples, slice them and toss them in a bowl with a little lemon juice to prevent browning. Remove any stems from the grapes and slice the tops off the strawberries, leaving the pointy ends for presentation.
Create Fun Shapes: Using Halloween-themed cookie cutters, cut slices of cheese into fun shapes such as ghosts, bats, or pumpkins. This adds an extra festive element to your platter.
Arrange the Cheese and Fruit: On a large serving platter or board, start layering your ingredients. Place the assorted cheese shapes in one section of the platter and arrange the grapes, strawberries, and apple slices around the cheese attractively. You can create clusters or lines with the fruit for a colorful look.
Add Crunchy Elements: Fill any gaps on the platter with mini pretzels and carrot sticks for added crunch. This not only adds variety but also makes the platter more visually appealing.
Final Touches: For a special touch, drizzle honey over the cheese or set it in a small bowl on the side for guests who wish to add sweetness to their cheese.
Serve and Enjoy: Once everything is arranged, serve your Frightening Fruit and Cheese Platter to your guests. Encourage them to mix and match the flavors of cheese and fruit for a deliciously spooky experience!
This easy-to-assemble platter is a great way to add something healthy and festive to your Halloween spread!
Haunted Hot Dog and Slider Stand
Haunted Hot Dog and Slider Stand is a fun and interactive dish for Halloween parties that will thrill both kids and adults! This playful take on classic favorites features spooky-themed hot dogs and mini sliders decorated to look like Halloween creatures. These easy-to-make treats are perfect for serving at gatherings, offering guests a deliciously frightful experience.
Prepare the Sliders: In a mixing bowl, combine the ground beef or turkey with a pinch of salt and pepper. Form the meat into small patties, about 2 inches wide. Use your thumb to create a slight indentation in the center of each patty to prevent them from puffing up while cooking.
Cook the Sliders: Heat a skillet or grill over medium-high heat. Place the slider patties on the hot surface and cook for about 4 minutes on each side or until cooked through. During the last minute of cooking, sprinkle shredded cheese on top of each patty to allow it to melt.
Prepare the Hot Dogs: While the sliders are cooking, prepare the hot dogs. You can make them look spooky by slicing them lengthwise to create “fingers” (be careful not to cut all the way through) or by using a sharp knife to make small cuts in the shape of a spider.
Cook the Hot Dogs: In a separate pot, bring water to a boil and add the hot dogs. Boil them for 5-7 minutes until heated through. If you prefer a grilled flavor, you can also grill them for about 6-8 minutes.
Assemble the Sliders: Place a slider patty on each mini bun. Add a piece of lettuce, a dollop of ketchup, and a squirt of mustard. To add a spooky touch, use olive slices to create eyes on top of the sliders and insert a toothpick to hold everything together. You can add a pickled jalapeño for an extra “ghoulish” touch.
Assemble the Hot Dogs: Place the prepared hot dogs in the remaining buns. For a fun presentation, you can create eyes using olive slices and decorate with black sesame seeds to resemble spiders. You can also start with a toothpick inserted for added decoration.
Serve and Enjoy: Arrange the completed sliders and hot dogs on a serving platter lined with Halloween-themed cupcake liners. Decorate the platter with plastic spiders or other Halloween decorations for a festive look. Encourage guests to mix and match toppings to create their own spooky creations.
These Haunted Hot Dog and Slider Stand treats are sure to be a hit at your Halloween gathering! Enjoy the whimsical fun and delicious flavors with your friends and family!