
Spooky Sandwich Cutouts

Spooky Sandwich Cutouts are a fun and festive way to make lunchtime a little more exciting for Halloween. These adorable sandwiches can be shaped like ghosts, bats, and pumpkins, making them a perfect addition to your child’s lunchbox. They are easy to prepare and can be customized with a variety of fillings, allowing you to let your creativity shine while providing delicious and nutritious options.
| Ingredients | Quantity |
|---|---|
| Bread (white, whole grain, or gluten-free) | 4 slices |
| Cream cheese or peanut butter | 1/2 cup |
| Jelly or jam (optional) | 1/4 cup |
| Sliced cucumbers, cheese, or deli meat | As needed |
| Cookie cutters (ghost, bat, pumpkin shapes) | 1 set |
| Black olives (for eyes) | 4-8 (halved) |
| Food coloring (optional) | As desired |
Cooking Steps
- Prepare Your Ingredients: Gather all the ingredients listed in the table above. Lay out your slices of bread on a clean surface or cutting board.
- Spread the Filling: Take your cream cheese or peanut butter and spread an even layer over two slices of bread. If you want to add jelly or jam, spread it over the cream cheese or peanut butter on one of the slices.
- Add Additional Ingredients: On top of the spread, layer your desired fillings. You can add slices of cucumbers, cheese, or deli meat to enhance the flavor and nutrition of the sandwich.
- Assemble the Sandwich: Place the second slice of bread on top of the filled slice, creating a complete sandwich. Press gently to keep it together.
- Cut Out Shapes: Using your cookie cutters, press down firmly on the sandwich to create spooky shapes like ghosts, bats, and pumpkins. Remove the outer edges to reveal the fun shapes.
- Add Features: To make your spooky shapes even more festive, use halved black olives as eyes. Simply press them into the appropriate spots on the sandwich cutouts to give them a fun and spooky look.
- Pack and Serve: Place the finished sandwich cutouts into your child’s lunchbox with a fun note or some fruit for a complete meal. Enjoy the delight on their faces when they see these spooky treats!
Make sure to experiment with different fillings and cookie cutter shapes for variety, and have fun creating a Halloween-themed lunch!
Pumpkin Patch Veggie Cups

Pumpkin Patch Veggie Cups are a delightful and nutritious way to add some Halloween spirit to your child’s lunchbox. These colorful cups are filled with fresh vegetables and a tasty dip, creating a fun and interactive snack that resembles a pumpkin patch. They are not only healthy but also visually appealing, making them a perfect addition to any Halloween-themed meal.
| Ingredients | Quantity |
|---|---|
| Baby carrots | 1 cup |
| Cucumber sticks | 1 cup |
| Bell pepper (orange or yellow) | 1 medium |
| Cherry tomatoes | 1 cup |
| Hummus or ranch dip | 1 cup |
| Edible green herbs (like parsley or cilantro) | A handful |
| Small cups or containers | 4 |
Cooking Steps
- Prepare Your Ingredients: Begin by rinsing all the vegetables under cold water to guarantee they are clean. Set aside a cutting board and knife.
- Cut the Vegetables: Chop the bell pepper into small pumpkin-like shapes if desired, or simply cut it into strips. Cut the cucumber into sticks, and wash the cherry tomatoes thoroughly. Make sure the baby carrots are ready to use without further cutting.
- Assemble the Cups: Take your small cups or containers and place them on a clean surface. Add a few tablespoons of hummus or ranch dip to the bottom of each cup. This will serve as a delicious base for your veggies.
- Add the Veggies: Arrange the prepared baby carrots, cucumber sticks, bell pepper strips, and cherry tomatoes in the cups. You can make the arrangement resemble a pumpkin patch by placing the green herbs on top or around the veggies to mimic grass.
- Garnish: If you’d like, finish off by adding a sprinkle of edible herbs on top for a pop of color and flavor. This not only enhances the appearance but also adds a fresh taste.
- Pack and Serve: Seal the cups with lids or plastic wrap to keep them fresh, and pack them into your child’s lunchbox. They will enjoy digging into their very own pumpkin patch filled with delicious and healthy treats.
These Pumpkin Patch Veggie Cups offer a colorful and nutritious option that is sure to impress during the Halloween season!
Monster Wraps With Creepy Eyes

Monster Wraps With Creepy Eyes are a fun and spooky lunch option that will delight kids during Halloween. These wraps are filled with nutritious ingredients, showcasing a colorful combination of veggies and protein, all rolled up in a tortilla. To add to the Halloween spirit, they are topped with edible “creepy eyes” for that extra fright factor. These wraps are not only delicious but also encourage kids to enjoy their lunch with a little twist of creativity.
| Ingredients | Quantity |
|---|---|
| Whole wheat tortillas | 4 |
| Hummus or cream cheese | 1 cup |
| Sliced turkey or ham | 8 ounces |
| Spinach leaves | 1 cup |
| Shredded carrots | 1 cup |
| Bell pepper (any color) | 1 medium |
| Olives (black or green) | 1/2 cup |
| Edible googly eyes | 12 |
Cooking Steps
- Prepare the Ingredients: Start by gathering all of your ingredients on a clean surface. Rinse the spinach leaves under cold water and pat them dry with a paper towel. Slice bell pepper into thin strips, and cut the olives in half if they are whole.
- Spread the Base: Take a whole wheat tortilla and place it flat on your cutting board. Spread a generous layer of hummus or cream cheese evenly over the entire surface of the tortilla. This will add flavor and act as glue for the fillings.
- Layer the Fillings: Start layering your fillings on one side of the tortilla. Begin with a few slices of turkey or ham, followed by a handful of spinach leaves, a sprinkling of shredded carrots, and a few slices of bell pepper. Make sure to distribute the ingredients evenly, but don’t overfill them.
- Roll the Wraps: Starting from the side with the fillings, carefully roll the tortilla tightly like a burrito, tucking in the sides as you go to keep the ingredients from spilling out. Once rolled, it should resemble a thick cylinder.
- Slice and Secure: Using a sharp knife, cut the wrap into bite-sized pieces or in half, depending on your preference. If desired, use toothpicks to secure them together and make them easier to handle.
- Add Creepy Eyes: Take the edible googly eyes and gently place them on the exterior of the wraps. You can use a small dab of hummus or cream cheese to help the eyes stick if needed. Position them to give your monsters a fun and spooky look.
- Pack and Serve: Arrange the Monster Wraps in your child’s lunchbox, ensuring they are snug and won’t move around. Add in a few extra carrot sticks or bell pepper strips alongside for a healthy crunch!
These Monster Wraps With Creepy Eyes are an amusing and tasty Halloween-themed lunch that will surely put a smile on your child’s face!
Ghostly Cheese and Crackers

Ghostly Cheese and Crackers are an enticingly spooky yet simple snack that kids will love for their Halloween lunches. This fun dish involves cute ghost-shaped cheese that pairs perfectly with crunchy crackers, offering a delightful mix of flavors while adding a creative twist to your lunch box. The kids will enjoy this interactive treat that is not only festive but also a great way to sneak in some dairy!
| Ingredients | Quantity |
|---|---|
| Cheese slices (mozzarella or cheddar) | 8 slices |
| Crackers (any flavor) | 16 pieces |
| Black olives | 8, sliced in half |
| Toothpicks | 8 |
| Edible markers (or food-safe pen) | Optional |
Cooking Steps
- Prepare the Cheese: Start by taking the cheese slices out of the package. Using a ghost-shaped cookie cutter, gently press down on each slice to create ghost shapes. If you don’t have a ghost-shaped cutter, you can simply cut the cheese into squares and trim the top edges to create a ghostly silhouette.
- Create Ghostly Faces: Using either an edible marker or a food-safe pen, draw spooky or funny faces on each of the ghost shapes. Think about eyes and mouth positions to give them personality. If you prefer a hands-on approach, you can use half of the black olives as ‘eyes’ by placing them on the cheese ghosts, creating an eerie look.
- Assemble the Snack: Take a cracker and place one ghost cheese on top. If you want to create a layered look, you can stack another cracker on top, but this isn’t necessary.
- Secure with Toothpicks: Gently insert a toothpick into the top of each ghost to help keep them in place and make them easier to pick up. This also adds a fun and festive touch to the presentation.
- Serve and Enjoy: Arrange the ghostly cheese and crackers on a plate or a lunchbox, and they are ready to be served! This spooky snack can be enjoyed as is or paired with additional dips for added flavor.
Now you have a fun and creative Halloween dish that will surely bring delight to any lunchbox!
Witch’s Brew Fruit Salad

Witch’s Brew Fruit Salad is a playful and colorful dish that’s perfect for Halloween! This delightful fruit medley allows kids to enjoy a variety of nutritious fruits while embracing the festive spirit of the holiday. With its vibrant colors and fun presentations, this fruit salad can be easily customized to include your child’s favorites, making it a healthy and tasty lunchbox treat.
| Ingredients | Quantity |
|---|---|
| Green grapes | 1 cup |
| Canned pineapple chunks | 1 cup |
| Orange slices | 2 oranges |
| Kiwi | 2, peeled and sliced |
| Blueberries | 1 cup |
| Pomegranate seeds | 1/2 cup |
| Blackberries | 1 cup |
| Edible googly eyes | Optional, for decoration |
Cooking Steps
- Prepare the Fruits: Start by rinsing the green grapes, blueberries, and blackberries under cold water to clean them. Peel the oranges and separate the segments, then cut any large segments in half. Peel the kiwis and slice them into rounds. If using canned pineapple, drain the juice well.
- Mix the Fruit: In a large mixing bowl, combine all the prepared fruits: green grapes, pineapple chunks, orange slices, kiwi rounds, blueberries, blackberries, and pomegranate seeds. Use a spatula or wooden spoon to gently toss everything together, ensuring that the fruits are well mixed without crushing them.
- Add the Witch’s Brew Touch: If you want to enhance the Halloween theme, you can add edible googly eyes on top of some of the fruit pieces, making them look like little monsters peeking out from the salad. This step adds an extra fun element and creates excitement for the kids.
- Chill the Salad: Cover the bowl with plastic wrap and place it in the refrigerator for about 30 minutes. Chilling the fruit salad helps to meld the flavors and keeps it invigorating.
- Serve and Enjoy: After chilling, transfer the Witch’s Brew Fruit Salad into a festive serving bowl or individual lunch containers. This colorful dish is a perfect way to sneak in healthy ingredients while celebrating Halloween. Enjoy the vibrant mix of flavors and textures!
Now you have a spooktacular fruit salad that’s easy to make and perfect for Halloween lunches!
Mummy Hot Dogs

Mummy Hot Dogs are a fun and festive twist on the classic hot dog, perfect for Halloween celebrations! These adorable “mummies” are made by wrapping hot dogs in strips of crescent roll dough, giving them a ghoulish appearance. Not only are they simple to prepare, but they also make for an exciting lunchbox treat that kids will love to show off!
| Ingredients | Quantity |
|---|---|
| Hot dogs | 8 |
| Refrigerated crescent roll dough | 1 can (8 oz) |
| Mustard or ketchup (for eyes) | Optional for serving |
Cooking Steps
- Preheat the Oven: Start by preheating your oven to 375°F (190°C). This guarantees that your Mummy Hot Dogs will bake perfectly.
- Prepare the Crescent Roll Dough: Open the can of refrigerated crescent roll dough and unroll it onto a clean surface. Use a pizza cutter or knife to cut the dough into thin strips, about 1/2 inch wide. You will need several strips to wrap around each hot dog.
- Wrap the Hot Dogs: Take one hot dog and start wrapping the dough strips around it. Begin at one end and spiral the strips around, leaving small gaps so the hot dog can peek through – this gives the mummy effect. Continue wrapping until the hot dog is mostly covered, leaving a small section at the top for the “face.”
- Place on Baking Sheet: As you finish wrapping each hot dog, place them on a baking sheet lined with parchment paper. Make sure they are spaced out to allow even cooking.
- Bake: Place the baking sheet in the preheated oven and bake for 12-15 minutes, or until the crescent dough is golden brown and cooked through.
- Add Eyes: Once the Mummy Hot Dogs have cooled slightly, you can use mustard or ketchup to dot on eyes. Simply squeeze a small amount onto the top part of the hot dog where you left the unwrapped space.
- Serve and Enjoy: Transfer the Mummy Hot Dogs to a serving platter or pack them into lunch containers. Enjoy these spooky yet delicious treats as a festive lunch or snack for Halloween!
With their whimsical look and delightful taste, Mummy Hot Dogs are bound to be a hit this Halloween season!
Haunted Trail Mix

Haunted Trail Mix is a spooktacular and healthy snack perfect for Halloween celebrations! This mix combines a variety of fun and festive ingredients that create a delightful treat, making it an ideal addition to lunchboxes or for munching at Halloween parties. With sweet and salty elements, it’s a great way to keep kids energized while they indulge in the Halloween spirit.
| Ingredients | Quantity |
|---|---|
| Cheddar cheese popcorn | 2 cups |
| Mini pretzels | 1 cup |
| Candy corn | 1 cup |
| Chocolate-covered raisins | 1 cup |
| Halloween-themed gummy candies | 1 cup |
| Sunflower seeds | ½ cup |
Cooking Steps
- Gather Ingredients: Start by gathering all the ingredients listed above. It’s crucial to have everything measured and ready to go before you begin mixing.
- Prepare the Base: In a large mixing bowl, add the cheddar cheese popcorn. This will serve as the base of your trail mix and provide a cheesy crunch.
- Add Pretzels: Next, pour in the mini pretzels. These add a salty contrast to the sweet treats and a fun crunch.
- Incorporate Candy Corn: Add the candy corn to the bowl. Their bright colors and sweet flavor make them a quintessential Halloween treat that will surely delight kids.
- Mix in Chocolate-Covered Raisins: Toss in the chocolate-covered raisins, providing a sweet and chewy component to your trail mix.
- Add Gummy Candies: Include the Halloween-themed gummy candies for an extra touch of fun and whimsy. Their spooky shapes add to the mix’s festive appearance.
- Sprinkle Sunflower Seeds: Finally, add the sunflower seeds which contribute a nutty flavor and additional crunch.
- Toss to Combine: Using a large spoon or spatula, gently toss all the ingredients together until well combined. Be careful not to crush the popcorn or pretzels.
- Serve or Store: You can serve the Haunted Trail Mix immediately in small cups or bags for individual servings. Alternatively, store it in an airtight container to keep it fresh, making it easy to pack into lunchboxes or to grab for a quick snack throughout the Halloween season.
Enjoy this fun and festive Haunted Trail Mix as a treat that brings a cheerful Halloween atmosphere to both kids and adults alike!
Eyeball Pasta Salad

Eyeball Pasta Salad is a fun and creative dish that adds a spooky twist to any Halloween gathering! With its colorful ingredients and playful presentation, this pasta salad will delight both kids and adults alike. The “eyeballs” made from mozzarella balls and olives take this dish to a whole new level of Halloween festivity, making it an enjoyable addition to lunchboxes or party spreads.
| Ingredients | Quantity |
|---|---|
| Uncooked rotini pasta | 8 ounces |
| Cherry tomatoes | 1 cup |
| Mozzarella balls (bocconcini) | 1 cup |
| Black olives | ½ cup |
| Fresh parsley (chopped) | ¼ cup |
| Olive oil | 3 tablespoons |
| Red wine vinegar | 2 tablespoons |
| Salt | to taste |
| Pepper | to taste |
Cooking Steps
- Cook the Pasta: Begin by bringing a large pot of salted water to a boil. Add the uncooked rotini pasta and cook according to package instructions until al dente. Once cooked, drain the pasta in a colander and rinse under cold water to cool it down quickly. Allow it to drain thoroughly.
- Prepare the “Eyeballs”: While the pasta is cooling, take the mozzarella balls and black olives. To create the eyeballs, slice the black olives in half. Each mozzarella ball will get one half of an olive placed on top, resembling a creepy eye. Set these aside.
- Chop the Tomatoes and Parsley: Cut the cherry tomatoes in half. Chop the fresh parsley finely. These ingredients will add color and freshness to your pasta salad.
- Combine Ingredients: In a large mixing bowl, combine the cooled rotini pasta, halved cherry tomatoes, chopped parsley, and the mozzarella “eyeballs” you prepared earlier. Gently mix together, ensuring the ingredients are evenly distributed.
- Dress the Salad: In a separate small bowl, whisk together the olive oil, red wine vinegar, salt, and pepper to create the dressing. Pour the dressing over the pasta salad, tossing gently to coat all the ingredients evenly.
- Taste and Adjust Seasoning: After mixing, taste the salad and adjust seasoning as needed, adding more salt and pepper if desired.
- Chill Before Serving: For the best flavors, cover the pasta salad with plastic wrap and refrigerate for at least 30 minutes before serving. This will allow the dressing to soak into the pasta and enhance the overall taste.
- Serve: After chilling, give the salad a final gentle toss. Transfer to a serving platter or individual bowls and enjoy your Eyeball Pasta Salad at your Halloween gathering or packed in lunchboxes for a spooky treat!
This catchy dish will surely make your Halloween celebrations even more delightful!
Skeleton Veggie Platter
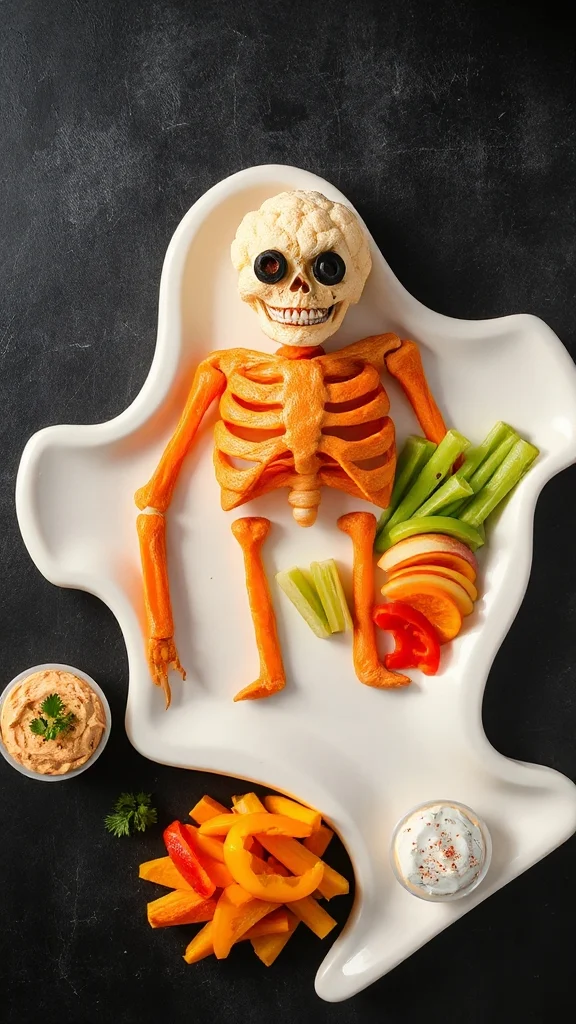
Skeleton Veggie Platter is a fun and interactive way to get kids excited about eating their vegetables during Halloween. This dish features an assortment of colorful vegetables arranged to resemble a skeleton, making it not only visually appealing but also a healthy addition to any holiday festivities. Perfect for lunchboxes or as a party platter, the Skeleton Veggie Platter encourages creativity and healthy snacking.
| Ingredients | Quantity |
|---|---|
| Carrots | 2 large, peeled |
| Celery | 3 stalks, cut into sticks |
| Cucumber | 1 medium, sliced |
| Cauliflower | 1 head, cut into florets |
| Bell peppers (various colors) | 2, sliced |
| Cherry tomatoes | 1 cup |
| Hummus | 1 cup (for dipping) |
| Olives | ½ cup |
Cooking Steps
- Prepare the Vegetables: Start by washing all the vegetables thoroughly. Peel the carrots and slice them into thin sticks. Cut the celery into equal-length sticks. Slice the cucumber into rounds. For the cauliflowers, separate the head into bite-sized florets. Slice the bell peppers into long strips.
- Create the Skeleton Shape: On a large serving platter, begin building the outline of the skeleton. Use the carrots to form the ribcage by laying them horizontally across the platter. For the spine, stand the celery sticks upright in the center of the platter, placing them vertically.
- Add the Skull and Bones: For the skull, create a rounded shape using a cluster of cauliflower florets. You can use cucumber slices as cheekbones and cherry tomatoes for eyes. To form the “arms” and “legs,” use bell pepper strips laid out on either side of the skeleton body, imitating a traditional skeleton pose.
- Decorate the Platter: Fill any gaps with additional cherry tomatoes or more cauliflower florets to add color and appeal. Make sure the platter looks fun and festive to attract the little ones.
- Serve with Hummus: Place a bowl of hummus in the center of the platter for dipping. You can also place small scoops of hummus around the skeleton to create smaller “skulls” if desired.
- Final Touch and Enjoy: Once the platter is arranged, you can adjust the placement of the vegetables as needed. Serve immediately or keep refrigerated until ready to serve.
This Skeleton Veggie Platter will be a hit at any Halloween gathering, promoting healthy eating while adding to the spooky atmosphere!
Boo-nana Bread Slices

Boo-nana Bread Slices are a delightful and spooky twist on the classic banana bread, perfect for Halloween-themed lunchboxes or as a festive treat. These delicious slices are easy to make and are certain to put a smile on your little ones’ faces, thanks to their fun ghostly decoration. The Boo-nana Bread is not just fun; it’s also made with nutritious bananas, making it a healthier snack option.
| Ingredients | Quantity |
|---|---|
| Ripe bananas | 3 large, mashed |
| All-purpose flour | 1 ½ cups |
| Granulated sugar | 3/4 cup |
| Baking powder | 1 teaspoon |
| Baking soda | 1 teaspoon |
| Salt | 1/4 teaspoon |
| Eggs | 2 large |
| Unsalted butter | 1/2 cup (melted) |
| Vanilla extract | 1 teaspoon |
| Chocolate chips (mini) | 1/2 cup |
| Optional: flaked coconut | 1/4 cup (for ghost hair) |
| Candy eyes | 1 pack (for decoration) |
Cooking Steps
- Preheat the Oven: Begin by preheating your oven to 350°F (175°C). This guarantees that the Boo-nana Bread will bake evenly.
- Prepare the Baking Pan: Grease a loaf pan with non-stick cooking spray or butter to prevent the bread from sticking. You can also line it with parchment paper for easy removal later.
- Mix the Dry Ingredients: In a medium bowl, whisk together the all-purpose flour, baking powder, baking soda, and salt. Mixing these ingredients first guarantees an even distribution of the leavening agents.
- Combine the Wet Ingredients: In a large mixing bowl, combine the mashed ripe bananas, sugar, melted butter, eggs, and vanilla extract. Use a fork or whisk to mix until the ingredients are well incorporated.
- Incorporate Dry Ingredients: Gradually add the dry ingredients to the wet ingredients, stirring gently until combined. Be careful not to overmix; it’s okay if some small lumps remain.
- Add Chocolate Chips: Fold in the mini chocolate chips gently, distributing them evenly throughout the batter. This will provide little bursts of sweetness in every bite.
- Pour into the Pan: Pour the batter into the prepared loaf pan, smoothing the top with a spatula.
- Bake: Place the loaf pan in the preheated oven and bake for 50-60 minutes, or until a toothpick inserted in the center comes out clean.
- Cool: Once baked, remove the Boo-nana Bread from the oven and let it cool in the pan for about 10 minutes. After that, transfer it to a wire rack to cool completely.
- Decorate: Once the bread is cool, slice it and use the candy eyes to create ghost faces on top of each slice. For an added spooky effect, consider sprinkling some flaked coconut for “hair” around the eyes.
- Serve and Enjoy: Your Boo-nana Bread Slices are now ready! Pack them into lunchboxes or serve them at Halloween parties for a sweet treat that kids will love.
These Boo-nana Bread Slices are certain to be a favorite this Halloween season!
Jack-o’-Lantern Stuffed Peppers

Jack-o’-Lantern Stuffed Peppers are a fun and festive way to celebrate Halloween while enjoying a nutritious meal. These vibrant orange bell peppers are hollowed out and filled with a delicious mixture of rice, ground meat, and spices, making not only a treat for the eyes but also a satisfying dish. They’re perfect for Halloween-themed family dinners or packed in lunchboxes for a spooky surprise.
| Ingredients | Quantity |
|---|---|
| Orange bell peppers | 4 large |
| Cooked rice | 1 cup |
| Ground beef or turkey | 1 pound |
| Onion (finely chopped) | 1 medium |
| Garlic (minced) | 2 cloves |
| Tomato sauce | 1 cup |
| Italian seasoning | 1 teaspoon |
| Salt | To taste |
| Pepper | To taste |
| Shredded cheese (optional) | 1 cup |
| Olive oil | 1 tablespoon |
Cooking Steps
- Preheat the Oven: Start by preheating your oven to 375°F (190°C). This will guarantee that your stuffed peppers cook evenly.
- Prepare the Peppers: Carefully slice the tops off the orange bell peppers and remove the seeds and membranes. Use a knife to gently carve Jack-o’-lantern designs on the front of each pepper. You can create spooky faces or fun designs according to your preference.
- Cook the Filling: In a large skillet, heat the olive oil over medium heat. Add the chopped onion and minced garlic, cooking until the onion is translucent, about 3-4 minutes. Then, add the ground beef or turkey, cooking until browned. Drain any excess fat.
- Combine Ingredients: In the skillet, stir in the cooked rice, tomato sauce, Italian seasoning, salt, and pepper. Mix well and let the filling simmer for about 5 minutes until heated through.
- Stuff the Peppers: Using a spoon, fill each carved bell pepper with the meat mixture, packing it down gently but not too tightly. If desired, sprinkle shredded cheese on top of the filling for an extra cheesy flavor.
- Bake: Place the stuffed peppers upright in a baking dish. If necessary, use a small amount of water at the bottom of the dish to help steam them. Cover the dish with aluminum foil and bake for 30 minutes.
- Uncover and Finish Baking: After 30 minutes, remove the foil and continue to bake for an additional 15 minutes to allow the tops to brown slightly.
- Serve: Once the peppers are tender and the filling is cooked through, carefully remove them from the oven. Let them cool for a few minutes before serving. Enjoy your festive Jack-o’-Lantern Stuffed Peppers!