Spooky Spider Deviled Eggs
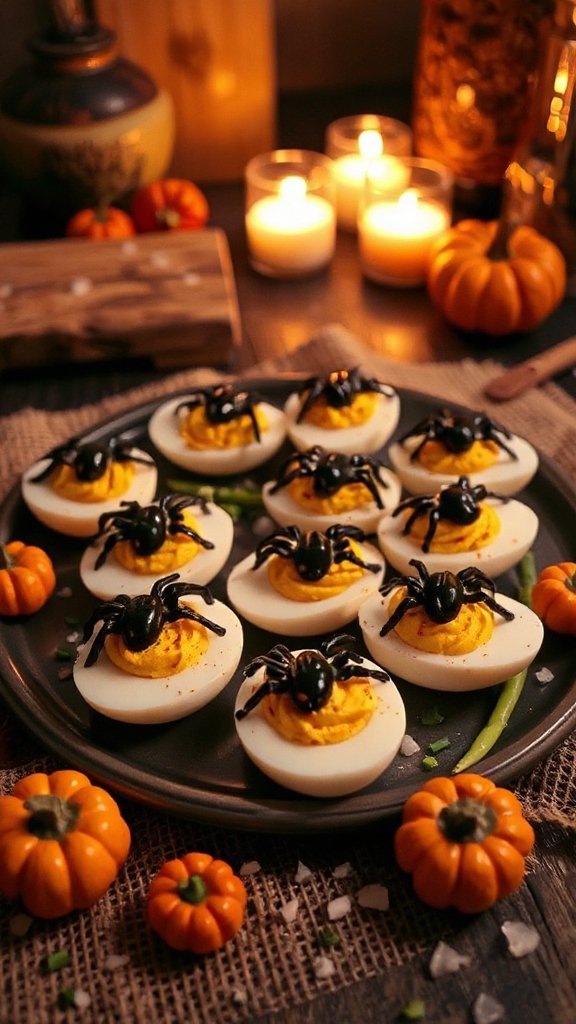
Spooky Spider Deviled Eggs are a fun and festive twist on the classic deviled egg, perfect for your Halloween gatherings. These ghoulish delights not only taste delicious but also add a creepy aesthetic to your party table. With their striking appearance resembling hairy spiders, they are sure to impress your guests and get everyone in the Halloween spirit!
| Ingredients | Quantity |
|---|---|
| Large eggs | 6 |
| Mayonnaise | 3 tablespoons |
| Dijon mustard | 1 teaspoon |
| Salt | 1/4 teaspoon |
| Black pepper | 1/4 teaspoon |
| Paprika | For garnish |
| Black olives | 6 (for spiders) |
| Whole almonds | 12 (for spider legs) |
Cooking Steps:
- Boil the Eggs: Place the large eggs in a saucepan and cover them with cold water. Bring the water to a boil over medium-high heat. Once boiling, cover the pot and remove it from heat. Let the eggs sit for 10-12 minutes.
- Cool the Eggs: After the sitting time, carefully transfer the eggs to a bowl of ice water using a slotted spoon. Allow them to cool for about 5-10 minutes. This makes peeling easier.
- Peel the Eggs: Gently tap the eggs on a hard surface to crack the shells, then peel them under running cold water to help remove the shells smoothly.
- Prepare the Yolks: Slice the peeled eggs in half lengthwise and carefully scoop out the yolks into a mixing bowl. Place the egg white halves on a serving platter.
- Make the Filling: Mash the egg yolks with a fork until crumbly. Add the mayonnaise, Dijon mustard, salt, and black pepper. Mix until smooth and creamy. Taste and adjust seasonings if necessary.
- Fill the Egg Whites: Using a spoon or a piping bag, fill the hollowed egg whites with the yolk mixture. Make sure to heap it up slightly for a more whimsical appearance.
- Create Spider Toppings: To make the spider decorations, cut each black olive in half lengthwise for the body. Slice the other half into thin strips to use as the spider legs. Place half an olive on each filled egg and arrange 6 almond slices around it for legs.
- Garnish and Serve: Sprinkle the tops of the filled eggs with a dash of paprika for an added touch of color. Your Spooky Spider Deviled Eggs are now ready to scare and delight your guests! Serve chilled and enjoy the spooky fun.
Pumpkin Spice Roasted Chickpeas

Pumpkin Spice Roasted Chickpeas are a deliciously crunchy snack that perfectly embodies the flavors of fall. Packed with protein and fiber, these chickpeas are not only a healthy option but also a tasty treat that will keep your Halloween celebrations festive. The warm spices of pumpkin pie combined with the nutty flavor of roasted chickpeas make for a delightful nibble that can be enjoyed by all.
| Ingredients | Quantity |
|---|---|
| Canned chickpeas | 1 (15-ounce) can |
| Olive oil | 1 tablespoon |
| Maple syrup | 1 tablespoon |
| Pumpkin pie spice | 1 teaspoon |
| Ground cinnamon | 1/2 teaspoon |
| Salt | 1/4 teaspoon |
| Ground ginger | 1/4 teaspoon |
| Vanilla extract | 1/2 teaspoon |
Cooking Steps:
- Preheat the Oven: Start by preheating your oven to 400°F (200°C). This guarantees that your chickpeas will roast perfectly.
- Prepare Chickpeas: Open the can of chickpeas and drain them in a colander. Rinse under cold water to remove any excess sodium and other preservatives. Shake off the excess water and pat the chickpeas dry with a clean kitchen towel. It is important that they are dry to achieve maximum crispiness.
- Season the Chickpeas: In a mixing bowl, combine the dried chickpeas with olive oil and maple syrup. Stir until the chickpeas are evenly coated.
- Add Spices: Sprinkle the pumpkin pie spice, ground cinnamon, salt, ground ginger, and vanilla extract over the chickpeas. Mix well to guarantee all the chickpeas are coated with the spice mixture.
- Spread on Baking Sheet: Line a baking sheet with parchment paper for easy cleanup. Spread the seasoned chickpeas in a single layer on the baking sheet to promote even roasting.
- Roast in Oven: Bake the chickpeas in the preheated oven for about 25-30 minutes, stirring halfway through the cooking time. You want them to be golden brown and crispy. Keep an eye on them towards the end to prevent burning.
- Cool and Serve: Once roasted, remove the chickpeas from the oven and let them cool for a few minutes. They will become even crunchier as they cool. Once cooled, serve them in a bowl or store them in an airtight container for snacking later.
Enjoy your Pumpkin Spice Roasted Chickpeas as a delightful treat this Halloween season!
Witch’s Brew Chili
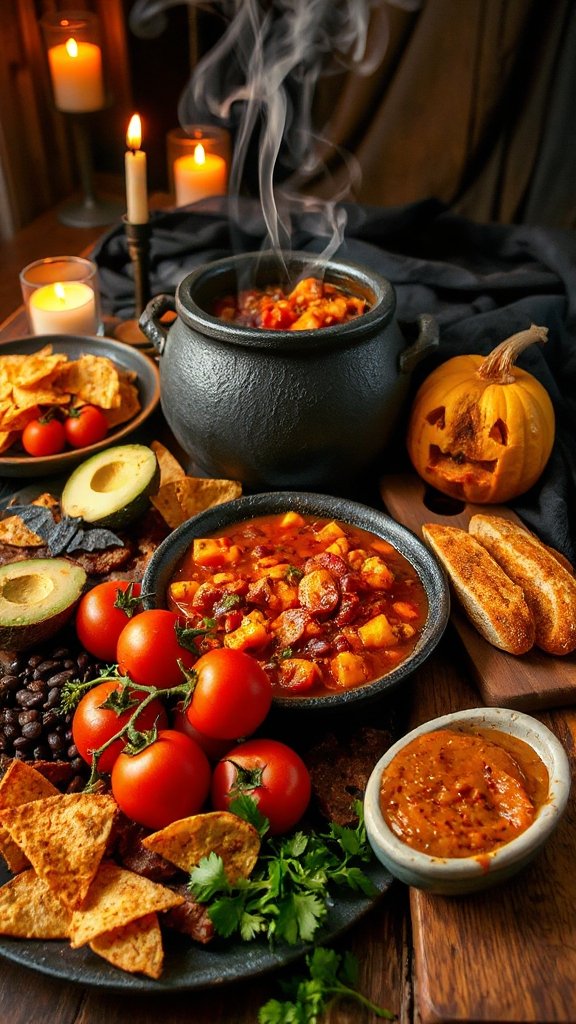
Witch’s Brew Chili is a festive and hearty dish that combines traditional chili ingredients with an enchanting twist perfect for Halloween gatherings. This chili features a colorful assortment of beans and vegetables, simmered in a spiced tomato base, making it both satisfying and visually appealing. It’s perfect for serving a crowd or enjoying on a chilly autumn night, embodying the spirit of witchcraft with its bold flavors and vibrant colors.
| Ingredients | Quantity |
|---|---|
| Olive oil | 2 tablespoons |
| Onion | 1, diced |
| Garlic | 3 cloves, minced |
| Bell peppers | 2, diced (one red, one green) |
| Carrot | 1, diced |
| Zucchini | 1, diced |
| Canned black beans | 1 (15-ounce) can |
| Canned kidney beans | 1 (15-ounce) can |
| Canned corn | 1 (15-ounce) can |
| Canned diced tomatoes | 1 (28-ounce) can |
| Chili powder | 2 tablespoons |
| Ground cumin | 1 teaspoon |
| Paprika | 1 teaspoon |
| Salt | 1 teaspoon |
| Black pepper | 1/2 teaspoon |
| Fresh cilantro (optional) | For garnish |
| Sour cream (optional) | For serving |
Cooking Steps:
- Heat the Oil: In a large pot or Dutch oven, heat the olive oil over medium heat. Allow it to warm for about 1 minute.
- Sauté Aromatics: Add the diced onion and sauté for about 4-5 minutes, until translucent. Stir in the minced garlic and continue to cook for an additional minute, until fragrant.
- Add Vegetables: Incorporate the diced bell peppers, carrot, and zucchini into the pot. Cook for another 5-7 minutes, stirring occasionally, until they begin to soften.
- Combine Beans and Corn: Stir in the canned black beans, kidney beans, and corn, making sure to drain and rinse the beans prior to adding them to the pot.
- Add Tomatoes and Spices: Pour in the canned diced tomatoes along with their juices. Then, sprinkle in the chili powder, ground cumin, paprika, salt, and black pepper, mixing everything together thoroughly.
- Simmer the Chili: Bring the mixture to a gentle boil, then reduce the heat to low. Cover the pot and let the chili simmer for about 30-40 minutes, stirring occasionally. This allows the flavors to meld together beautifully.
- Taste and Adjust: After simmering, taste the chili and adjust the seasoning if necessary. If you prefer a spicier chili, feel free to add more chili powder or other spices at this stage.
- Serve: Once the chili is ready, ladle it into bowls. Garnish with chopped fresh cilantro and a dollop of sour cream, if desired, before serving.
Enjoy serving this spooktacular Witch’s Brew Chili at your Halloween festivities!
Caramel Apple Nachos

Caramel Apple Nachos are a fun and festive dessert that brings a delightful twist to traditional nachos! This easy-to-make treat features crispy apple slices drizzled with creamy caramel sauce, sprinkled with crunchy toppings like peanuts and chocolate chips. Perfect for Halloween parties or fall gatherings, these nachos offer delicious flavors and a great way to enjoy fresh apples.
| Ingredients | Quantity |
|---|---|
| Apples | 3, sliced (any variety) |
| Caramel sauce | 1 cup |
| Chocolate chips | 1/2 cup |
| Chopped nuts (e.g., peanuts, walnuts) | 1/2 cup |
| Mini marshmallows | 1/2 cup |
| Cinnamon (optional) | 1 teaspoon |
| Whipped cream (optional) | For serving |
Cooking Steps:
- Prepare the Apples: Wash and slice the apples into thin wedges, removing the core and seeds. You may leave the skin on for added texture and nutrition.
- Arrange the Apple Slices: On a large serving platter or a baking sheet lined with parchment paper, arrange the apple slices in an even layer, overlapping slightly if you prefer.
- Drizzle Caramel Sauce: Warm the caramel sauce slightly in the microwave (about 15-30 seconds) for easier drizzling. Using a spoon or squeeze bottle, generously drizzle the warm caramel sauce over the arranged apple slices.
- Add Toppings: Sprinkle the chocolate chips, chopped nuts, and mini marshmallows evenly over the caramel-drizzled apples. Feel free to customize the toppings based on your preferences!
- Optional Cinnamon Dusting: If desired, sprinkle a little cinnamon over the nachos for an added flavor twist.
- Serve Immediately: Serve the Caramel Apple Nachos right away for the best texture, as the apples are freshest and the toppings remain crunchy. Offer whipped cream on the side for a delicious dipping option. Enjoy your spooky treat!
Ghostly Mini Pizza Bites

Ghostly Mini Pizza Bites are a playful and spooky take on traditional pizza, perfect for Halloween parties or fun snacks! These bite-sized delights feature mini pizza crusts topped with gooey cheese and pepperoni, artfully arranged to resemble cute little ghosts. Kids and adults alike will love their eerie charm and delicious taste!
| Ingredients | Quantity |
|---|---|
| Mini pizza crusts or English muffins | 8-10 pieces |
| Mozzarella cheese (shredded) | 2 cups |
| Pepperoni slices | 1 cup |
| Black olives (sliced) | 1/2 cup |
| Italian seasoning (optional) | 1 teaspoon |
| Olive oil (for brushing) | 1 tablespoon |
| Cooking spray (for greasing) | As needed |
Cooking Steps:
- Preheat the Oven: Preheat your oven to 375°F (190°C). This will guarantee that the mini pizza bites bake evenly and become golden and crispy.
- Prepare the Pizza Base: If using English muffins, slice them in half to create your base. Arrange the mini pizza crusts or English muffin halves on a baking sheet lined with parchment paper or lightly greased with cooking spray.
- Brush with Olive Oil: Lightly brush the tops of the pizza bases with olive oil to help them crisp up during baking. This step adds flavor and a nice golden color to the crusts.
- Add Cheese: Evenly sprinkle a generous amount of shredded mozzarella cheese over the top of each mini pizza base. Make sure to leave a little room around the edges for the cheese to melt and bubble up.
- Create Ghosts with Pepperoni: Place slices of pepperoni on top of the cheese to form ghost shapes. For each ghost, you can use 2-3 pepperoni slices arranged to mimic the shape of a ghost. This will allow the cheese to melt around the edges, creating a cute ghostly effect.
- Add Eyes: Use sliced black olives to create eyes for your ghostly pizzas. Place two olive slices for each ghost to give it a spooky look.
- Sprinkle Seasoning (Optional): If you like, dust a little Italian seasoning over the top for additional flavor.
- Bake the Mini Pizza Bites: Place the baking sheet in the preheated oven. Bake for about 10-12 minutes, or until the cheese is melted and bubbling, and the edges of the crusts are golden brown.
- Cool and Serve: Once baked, remove the mini pizza bites from the oven and allow them to cool for a minute. Serve warm, and enjoy your ghostly treats at your Halloween gathering!
Spicy Candy Corn Trail Mix

Spicy Candy Corn Trail Mix is a fun and festive snack that combines the sweetness of candy corn with a delightful crunch and hint of spice. This unique mix makes for a perfect treat for Halloween gatherings or as a tasty snack to enjoy while watching spooky movies. It’s easy to prepare, and you can customize it to suit your taste!
| Ingredients | Quantity |
|---|---|
| Candy corn | 2 cups |
| Roasted peanuts | 1 cup |
| Pretzel bites | 1 cup |
| Spicy cheese crackers | 1 cup |
| Pumpkin seeds (optional) | 1/2 cup |
| cayenne pepper | 1/2 teaspoon |
| chili powder | 1 teaspoon |
| Salt | 1/4 teaspoon |
| Olive oil | 1 tablespoon |
Cooking Steps:
- Prepare the Spice Mixture: In a small bowl, combine the cayenne pepper, chili powder, and salt. Mix well to incorporate all the spices evenly.
- Preheat the Oven (optional): If you prefer a toasted flavor for your trail mix, preheat your oven to 350°F (175°C).
- Combine Dry Ingredients: In a large mixing bowl, add the candy corn, roasted peanuts, pretzel bites, spicy cheese crackers, and pumpkin seeds (if using). Stir to mix the ingredients together.
- Add Olive Oil: Drizzle the olive oil over the mixture. This will help the spices adhere to the trail mix.
- Add the Spices: Sprinkle the spice mixture over the trail mix and toss well to make sure all ingredients are evenly coated.
- Toast the Trail Mix (optional): If using the oven, spread the trail mix evenly on a baking sheet and toast in the preheated oven for about 10-12 minutes, stirring halfway through to prevent burning. Keep a close eye on it to avoid over-toasting.
- Cool and Serve: Once the trail mix is done toasting (or if you skip the toasting step), let it cool for a few minutes at room temperature. Serve in a festive bowl or package it in individual bags for a grab-and-go snack.
Enjoy your Spicy Candy Corn Trail Mix as a delightful treat that perfectly balances sweet and spicy flavors!
Chocolate Mummy Brownies

Chocolate Mummy Brownies are a spooky twist on classic brownies, perfect for Halloween festivities! These rich, fudgy squares are topped with white chocolate and decorated to resemble little mummies, adding a fun and creative element to your dessert table. They’re guaranteed to impress both kids and adults alike with their cute presentation and delicious taste.
| Ingredients | Quantity |
|---|---|
| Brownie mix | 1 box (typically made for 9×13 pan) |
| Eggs | 2 large |
| Vegetable oil | 1/2 cup |
| Water | 1/4 cup |
| White chocolate chips | 1 cup |
| Chocolate chips | 1/2 cup |
| Candy eyes | 1 package |
Cooking Steps:
- Prepare the Brownie Batter: In a mixing bowl, combine the brownie mix, eggs, vegetable oil, and water. Stir until the mixture is well blended and smooth.
- Bake the Brownies: Preheat your oven to 350°F (175°C). Pour the brownie batter into a greased 9×13 inch pan, spreading it evenly. Bake according to the package instructions, usually 20-25 minutes, or until a toothpick inserted in the center comes out with a few moist crumbs.
- Cool the Brownies: Once baked, remove the brownies from the oven and allow them to cool completely in the pan on a wire rack. This will make sure they are easy to cut and decorate.
- Cut the Brownies: When the brownies are fully cooled, cut them into rectangular pieces, approximately 2×3 inches in size.
- Melt the White Chocolate: In a microwave-safe bowl, combine the white chocolate chips. Microwave in 30-second intervals, stirring well in between, until fully melted and smooth.
- Decorate with White Chocolate: Using a piping bag or a spoon, drizzle the melted white chocolate over the brownie rectangles, creating a “mummy wrap” look. Allow some of the brownie to show through as if the mummies are wrapped partially.
- Add the Candy Eyes: While the white chocolate is still warm and slightly tacky, place two candy eyes on each brownie to resemble mummy heads.
- Let the Chocolate Set: Allow the brownies to sit for a few minutes at room temperature so the white chocolate can fully harden.
- Serve and Enjoy: Arrange the Chocolate Mummy Brownies on a spooky-themed platter and serve them at your Halloween gathering. Enjoy the delicious brownie treat with a festive flair!
These Chocolate Mummy Brownies will not only satisfy your sweet tooth but will also add an adorable touch to your Halloween celebrations!

