
As an Amazon Associate I earn from qualifying purchases.
Editorial Policy | Disclosure Policy
Colorful Fruit Skewers
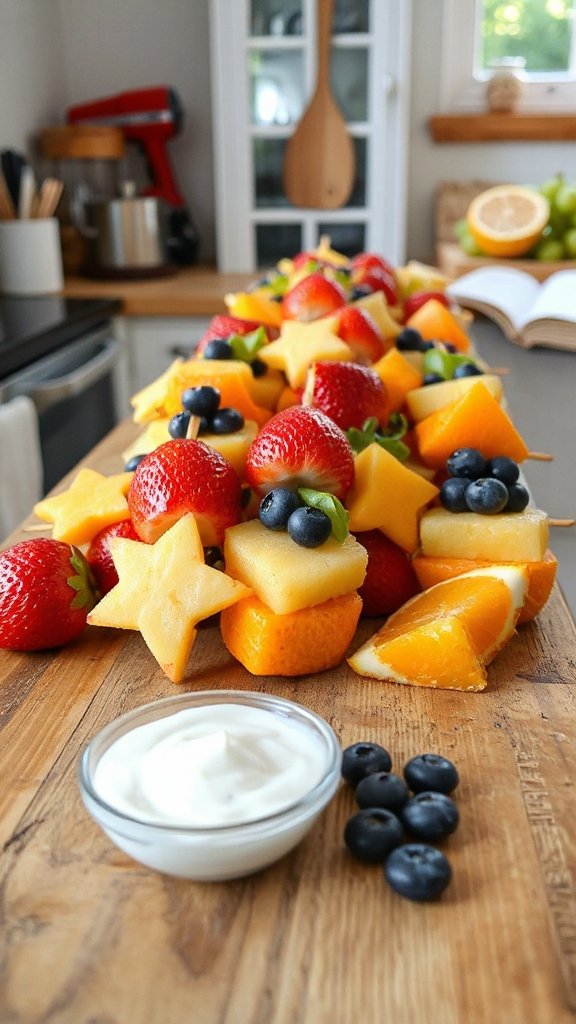
Colorful fruit skewers are a fun and healthy snack option for back-to-school season. They are easy to prepare, perfect for lunch boxes or after-school treats, and can be customized with a variety of fruits to please even the pickiest eaters. These vibrant skewers not only look appealing but also provide essential vitamins and nutrients, making them a great choice for kids.
| Ingredients | Quantity |
|---|---|
| Strawberries | 1 cup |
| Pineapple chunks | 1 cup |
| Green grapes | 1 cup |
| Blueberries | 1 cup |
| Kiwi slices | 2 |
| Banana slices | 1 |
| Skewers | 6-8 |
Instructions:
- Wash all the fruits thoroughly and pat them dry.
- Cut the strawberries, kiwi, and banana into bite-sized pieces.
- On each skewer, alternate threading the fruit pieces in a colorful pattern.
- Repeat until all ingredients are used, making sure to leave some space at both ends of the skewers.
- Serve immediately or store in the refrigerator until ready to enjoy!
Sandwich Art
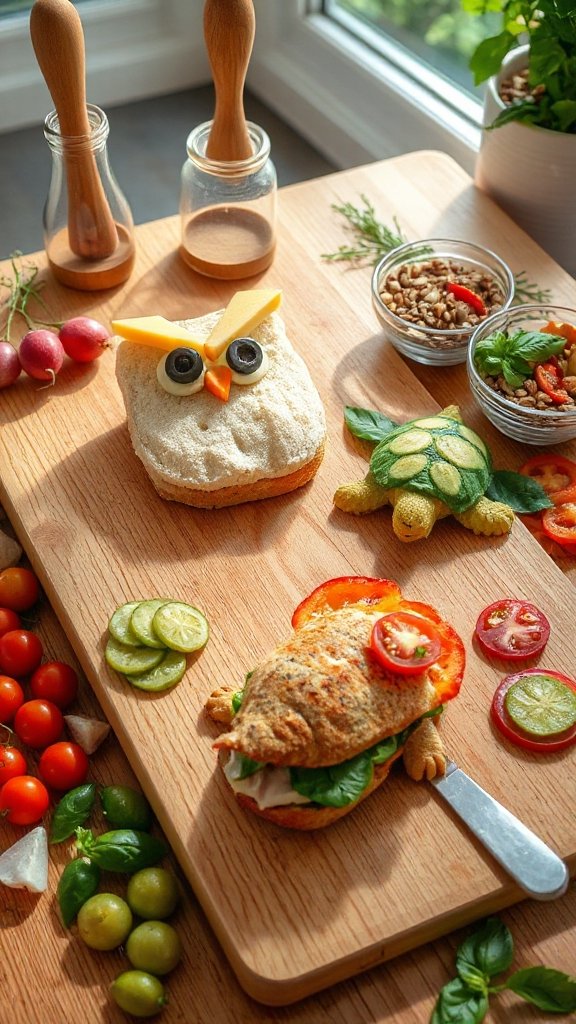
Sandwich art is a fantastic and creative way to get kids excited about lunchtime! By turning simple sandwiches into fun shapes and designs, you can encourage kids to eat their meals while incorporating a variety of healthy ingredients. This whimsical approach not only makes lunchtime more enjoyable but also sparks creativity and engagement.
| Ingredients | Quantity |
|---|---|
| Bread (whole grain) | 4 slices |
| Deli meat (turkey or ham) | 4 slices |
| Cheese (cheddar or mozzarella) | 4 slices |
| Lettuce | 4 leaves |
| Tomato slices | 4 slices |
| Cucumber slices | 1 cup |
| Cookie cutters | Various shapes |
| Optional spreads (hummus, mayo) | As needed |
Instructions:
- Use cookie cutters to cut the bread into fun shapes (like stars, hearts, or animals).
- Layer deli meat and cheese on one slice of the shaped bread.
- Add lettuce, tomato, and cucumber slices to create colorful layers.
- Place another shaped slice of bread on top to complete the sandwich.
- Use additional cookie cutters to cut out fun shapes from the leftover bread for mini sandwiches or snacks.
- Serve immediately or wrap individually for lunchboxes!
Edible Pencil Cookies
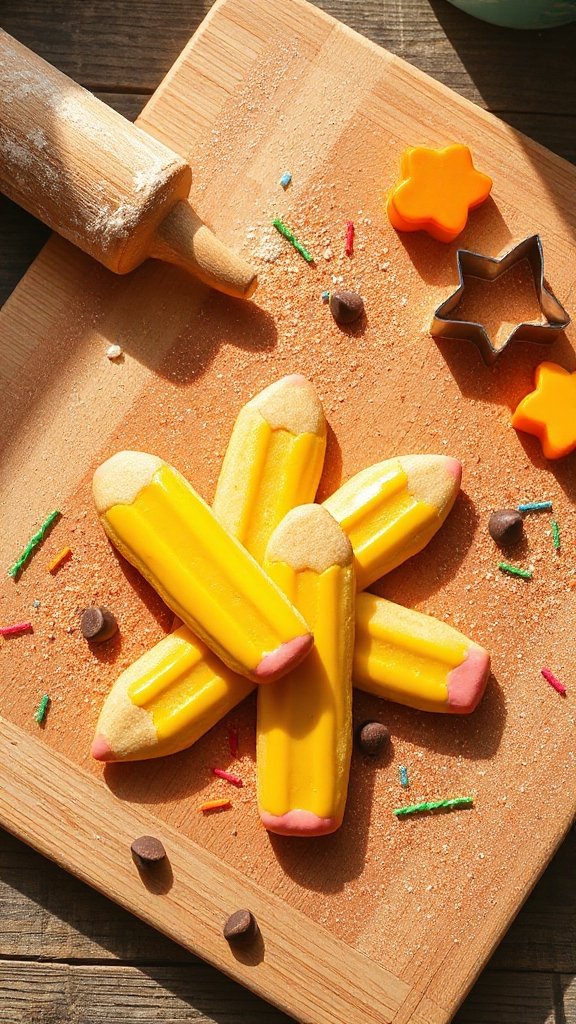
Edible pencil cookies are a fun and creative way to celebrate the back-to-school season! These delightful cookies are shaped like pencils, making them a perfect treat for classrooms or lunchboxes. Not only do they appeal to kids with their playful design, but they’re also easy to make and decorate, providing an opportunity for some hands-on baking fun.
| Ingredients | Quantity |
|---|---|
| All-purpose flour | 2 cups |
| Granulated sugar | 1 cup |
| Unsalted butter (softened) | 1/2 cup |
| Egg | 1 large |
| Vanilla extract | 1 teaspoon |
| Baking powder | 1 teaspoon |
| Salt | 1/4 teaspoon |
| Yellow food coloring | A few drops |
| Pink frosting | 1/2 cup |
| Chocolate chips | 1/3 cup |
| Edible markers or icing | For decorating |
Instructions:
- Preheat your oven to 350°F (175°C) and line baking sheets with parchment paper.
- In a large bowl, cream together the softened butter and granulated sugar until light and fluffy.
- Beat in the egg and vanilla extract, followed by the baking powder, flour, salt, and yellow food coloring until well combined.
- Divide the dough into log shapes to resemble pencils and place them on the baking sheets.
- Use your finger or a tool to shape one end into a point and flatten the other end slightly.
- Bake for 10-12 minutes or until the edges are lightly golden. Let cool completely.
- Once cooled, use pink frosting on one end for the eraser and chocolate chips or edible markers for decoration.
- Allow your pencil cookies to set before packing them up for a tasty school treat!
Yogurt Parfait Cups
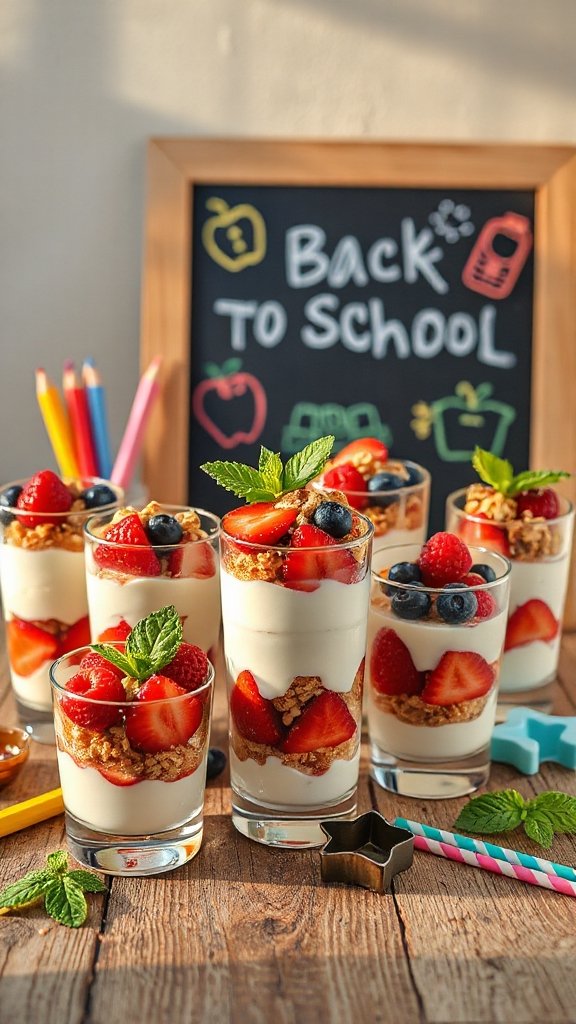
Yogurt parfait cups are a delicious and nutritious way to start the school day or to serve as an after-school snack. These layered treats combine creamy yogurt, fresh fruits, and crunchy granola, making them not only visually appealing but also a great source of vitamins and energy. Perfect for packing in lunchboxes, yogurt parfaits are quick to assemble and can be customized with various flavor combinations to suit any palette!
| Ingredients | Quantity |
|---|---|
| Yogurt (greek or regular) | 2 cups |
| Granola | 1 cup |
| Fresh berries (strawberries, blueberries, etc.) | 1 cup |
| Honey or maple syrup | 2 tablespoons |
| Optional toppings (coconut flakes, nuts, etc.) | As desired |
Instructions:
- In a clear cup or glass, spoon a layer of yogurt at the bottom.
- Add a layer of granola on top of the yogurt layer.
- Next, layer in the fresh berries.
- Repeat the layers until the cup is filled, finishing with a layer of berries on top.
- Drizzle honey or maple syrup over the top layer if desired, and add any optional toppings.
- Serve immediately or cover with a lid and chill in the fridge until ready to pack for school. Enjoy!
Apple Slice Smiles
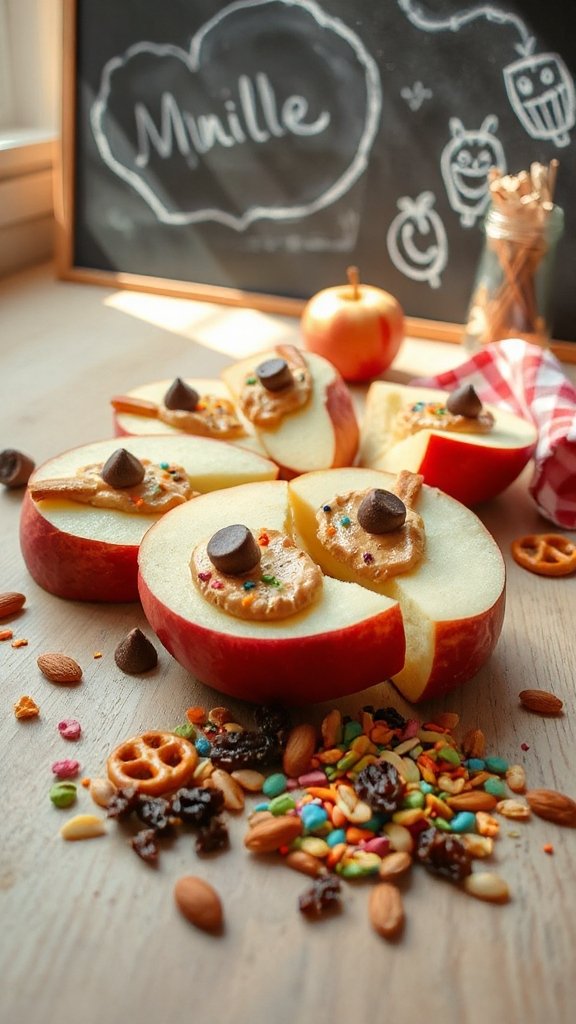
Apple Slice Smiles are a fun and healthy snack that kids will love! These delightful treats feature crisp apple slices that are transformed into playful “smiles” using peanut butter, mini chocolate chips, and optional toppings. They make for a perfect after-school snack or a fun addition to lunchboxes. Plus, they’re easy to assemble, allowing kids to help create their own tasty masterpieces!
| Ingredients | Quantity |
|---|---|
| Apples (any variety) | 2 |
| Peanut butter (or alternative) | 1/2 cup |
| Mini chocolate chips | 1/4 cup |
| Optional toppings (sprinkles, raisins, etc.) | As desired |
Instructions:
- Core and slice the apples into wedges, keeping the skin on for added nutrients.
- Spread a thin layer of peanut butter on one side of each apple slice.
- Place mini chocolate chips on top of the peanut butter to create a “smile.”
- Assemble the apple slices in the shape of a smile on a plate.
- Add any optional toppings for extra fun and flavor.
- Serve immediately or store in an airtight container for later enjoyment. Enjoy your delicious Apple Slice Smiles!
Veggie Face Dippers
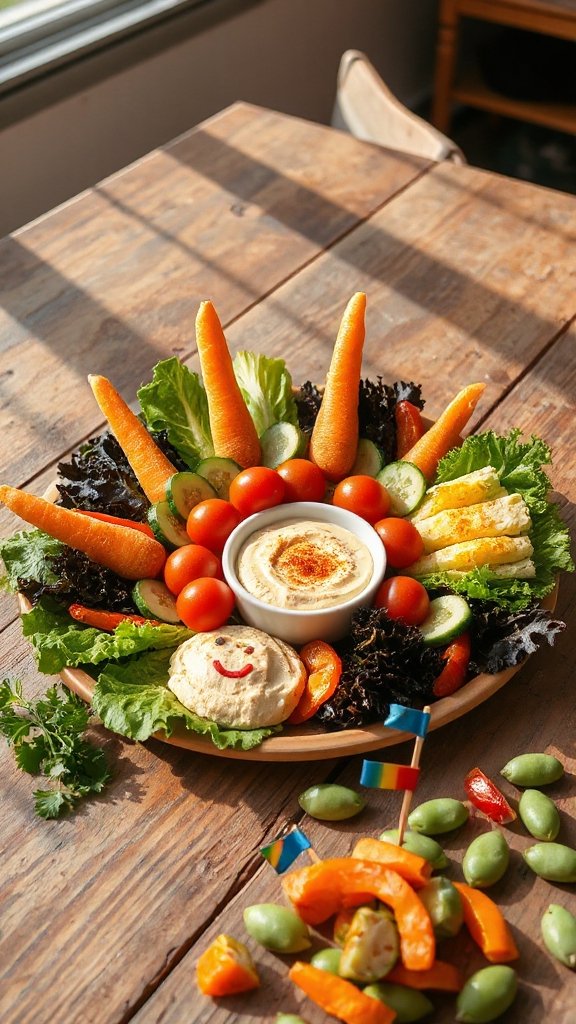
Veggie Face Dippers are a creative and nutritious way to encourage kids to eat their vegetables! These fun snacks not only serve as a colorful and healthy treat but also allow kids to get involved by decorating their own veggie faces. By using an assortment of fresh vegetables, dips, and edible embellishments, each child can create a unique and silly masterpiece that’s perfect for after-school snacking or packed lunches.
| Ingredients | Quantity |
|---|---|
| Carrot sticks | 1 cup |
| Cucumber slices | 1 cup |
| Bell pepper strips | 1 cup (assorted colors) |
| Cherry tomatoes | 1 cup |
| Hummus or ranch dressing | 1 cup |
| Olives (sliced) | 1/2 cup |
| Celery sticks | 1 cup |
| Optional toppings (cheese, nuts, etc.) | As desired |
Instructions:
- Prepare all the vegetables by washing and cutting them into suitable shapes (sticks, slices, etc.).
- Arrange the veggie pieces on a large plate or platter, grouping them together to form faces.
- Use cherry tomatoes for eyes, olives for pupils, and bell peppers for hair or eyebrows.
- Serve with hummus or ranch dressing in small bowls for dipping.
- Allow kids to create their own veggie faces and enjoy eating their creations!
DIY Pizza Faces
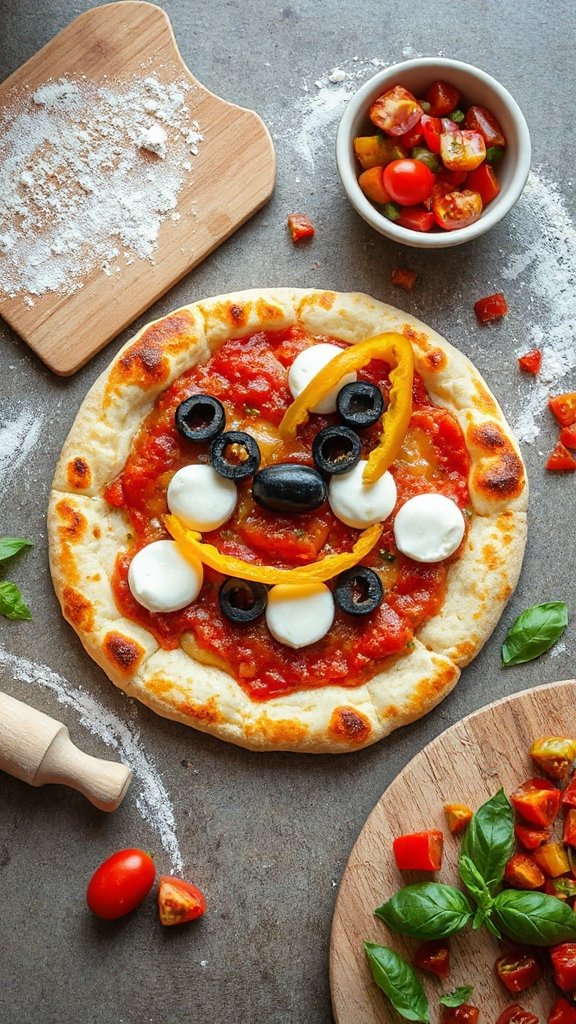
DIY Pizza Faces are a fun and customizable way to get kids excited about cooking and eating their meals! This interactive dish allows children to create their own pizza masterpieces using a variety of toppings that they can choose and arrange. Not only do these colorful pizza faces make for a delicious meal, but they also foster creativity and make mealtime enjoyable.
| Ingredients | Quantity |
|---|---|
| English muffins or mini pizza crusts | 4 pieces |
| Pizza sauce | 1 cup |
| Shredded mozzarella cheese | 1 cup |
| Pepperoni slices | 1/2 cup |
| Olives (sliced) | 1/4 cup |
| Bell pepper (sliced) | 1/2 cup (assorted colors) |
| Cherry tomatoes (halved) | 1/2 cup |
| Fresh basil leaves (optional) | As desired |
Instructions:
- Preheat the oven to 400°F (200°C).
- Place the English muffins or mini pizza crusts on a baking sheet.
- Spread a generous amount of pizza sauce over each muffin or crust.
- Sprinkle shredded mozzarella cheese evenly on top of the sauce.
- Use pepperoni slices, olives, bell peppers, and cherry tomatoes to create silly faces on the pizzas.
- Bake in the oven for about 10-12 minutes, or until the cheese is bubbly and golden.
- Remove from the oven, garnish with fresh basil leaves if desired, and let cool slightly before serving. Enjoy making and eating your DIY Pizza Faces!
Fruit Roll-Up Bookmarks
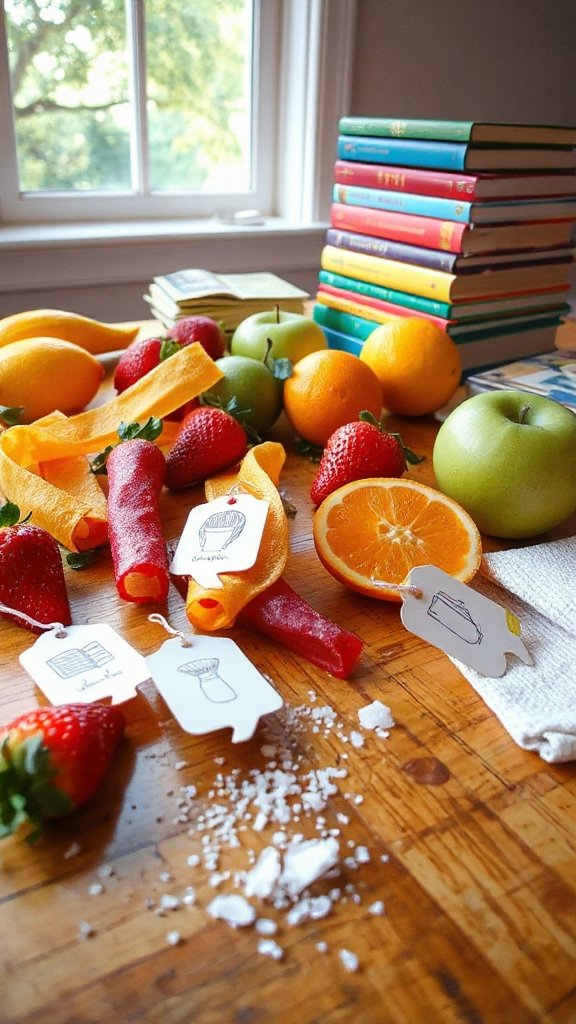
Fruit Roll-Up Bookmarks are a tasty and creative way to encourage reading while adding a fun element to your child’s back-to-school supplies. These edible bookmarks are not only colorful and chewy but also a great way to get kids excited about using them during their reading time. Plus, they can be made easily at home with just a few ingredients!
| Ingredients | Quantity |
|---|---|
| Fruit Roll-Ups | 4-6 sheets |
| Edible markers (optional) | As needed |
| Scissors | N/A |
| Ribbon or string (optional) | N/A |
Instructions:
- Lay out the fruit roll-up sheets on a clean, flat surface.
- Use scissors to cut each sheet into rectangular strips (about 1 inch by 6 inches).
- If desired, use edible markers to draw fun designs, quotes, or your child’s name on each strip.
- Optionally, punch a hole at one end of the bookmark and thread a ribbon or string through for a decorative touch.
- Let the bookmarks sit for a few minutes to firm up before using them.
- Enjoy munching on the scraps from any leftover fruit roll-up pieces!
Now your little ones have a delicious and personalized bookmark to enhance their reading experience!
S’mores Lunchbox Treats

S’mores Lunchbox Treats are a delightful and portable twist on the classic campfire dessert that kids love. These sweet, chewy treats combine graham crackers, chocolate, and marshmallows, all packed into a convenient form that’s perfect for lunchboxes, after-school snacks, or fun treats at home. Easy to make and even easier to enjoy, these S’mores Treats will certainly be a hit among children and adults alike!
| Ingredients | Quantity |
|---|---|
| Graham cracker crumbs | 1 ½ cups |
| Mini marshmallows | 1 cup |
| Milk chocolate chips | 1 cup |
| Butter, melted | ¼ cup |
| Honey | 2 tablespoons |
| Vanilla extract | 1 teaspoon |
Instructions:
- In a mixing bowl, combine graham cracker crumbs, melted butter, honey, and vanilla extract until well mixed.
- Press the mixture into the bottom of a greased 9×9 inch baking pan to form the crust.
- Layer the mini marshmallows and chocolate chips evenly over the crust.
- Bake in a preheated oven at 350°F (175°C) for 10-12 minutes, or until the marshmallows are golden and the chocolate is melted.
- Allow to cool completely before cutting into squares and packing them in lunchboxes.
These S’mores Lunchbox Treats are sure to bring smiles to your child’s face during snack time!
Cheesy Animal Crackers
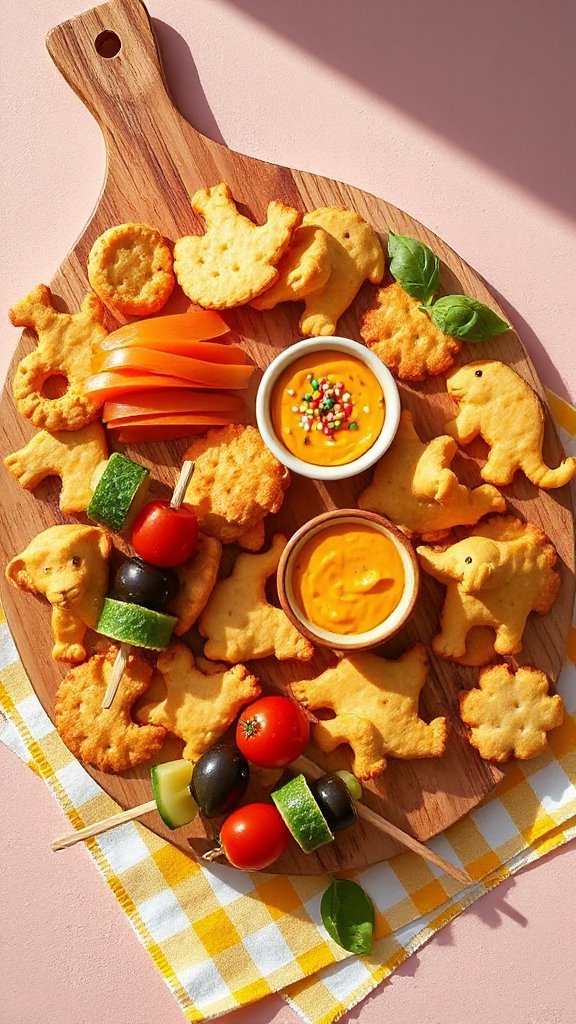
Cheesy Animal Crackers are a fun and savory snack that combines the beloved shape and appeal of animal crackers with the deliciousness of cheese. These homemade treats are easy to prepare and can be packed in lunchboxes or enjoyed as an after-school snack. The cheesy flavor makes them irresistible to both kids and adults!
| Ingredients | Quantity |
|---|---|
| All-purpose flour | 2 cups |
| Cheddar cheese, shredded | 1 cup |
| Unsalted butter, softened | ½ cup |
| Milk | ¼ cup |
| Baking powder | 1 teaspoon |
| Salt | ½ teaspoon |
| Garlic powder | ¼ teaspoon |
| Animal-shaped cookie cutter | – |
Instructions:
- Preheat your oven to 350°F (175°C) and line a baking sheet with parchment paper.
- In a mixing bowl, combine flour, baking powder, salt, and garlic powder.
- Add the shredded cheddar cheese and softened butter to the dry ingredients, mixing until crumbly.
- Pour in the milk gradually, stirring until a dough forms.
- Roll out the dough on a floured surface to about ¼ inch thick and cut out shapes with the animal cookie cutter.
- Transfer the cutouts to the prepared baking sheet and bake for 12-15 minutes or until golden.
- Allow to cool before packing into lunchboxes or serving as a snack.
These Cheesy Animal Crackers are a delightful and cheesy addition to any lunchtime spread!
Rice Cake Sandwiches
Rice Cake Sandwiches are a versatile and fun snack that can be easily customized to suit any taste preference. They serve as a great alternative to traditional sandwiches, perfect for lunchboxes or after-school snacks. With their light and crispy texture, rice cakes can be layered with various spreads and toppings, making them an excellent choice for kids and adults alike!
| Ingredients | Quantity |
|---|---|
| Rice cakes | 4 |
| Cream cheese | ½ cup |
| Sliced cucumber | ½ cup |
| Sliced turkey or ham | 4 slices |
| Shredded carrots | ½ cup |
| Hummus | ½ cup |
| Lettuce leaves | 4 leaves |
| Olive oil (optional) | For drizzling |
| Salt and pepper (optional) | To taste |
Instructions:
- Spread a layer of cream cheese on two of the rice cakes.
- Top the cream cheese with sliced cucumbers, turkey or ham, shredded carrots, and lettuce leaves.
- Drizzle with olive oil and season with salt and pepper if desired.
- Place the remaining rice cakes on top to create a sandwich.
- Cut in half if desired and enjoy as a snack or lunch!
These Rice Cake Sandwiches are not only nutritious but also allow for endless creativity with fillings and toppings!