
As an Amazon Associate I earn from qualifying purchases.
Editorial Policy | Disclosure Policy
Zucchini Fries With Garlic Aioli

Zucchini fries are a delicious and healthy twist on traditional French fries, offering a crispy exterior with a tender inside. Paired with a flavorful garlic aioli, these oven-baked zucchini fries make for a perfect snack or side dish that is not only low in calories but also packed with nutrients. The garlic aioli adds a creamy, savory kick that enhances the flavors of the zucchini.
| Ingredients | Quantity |
|---|---|
| Zucchini | 2 medium |
| Bread crumbs | 1 cup |
| Grated Parmesan cheese | 1/2 cup |
| Olive oil | 2 tablespoons |
| Garlic powder | 1 teaspoon |
| Salt | 1/2 teaspoon |
| Black pepper | 1/4 teaspoon |
| Mayonnaise | 1/2 cup |
| Fresh garlic | 2 cloves, minced |
| Lemon juice | 1 tablespoon |
Cooking Steps:
- Preheat your oven to 425°F (220°C) and line a baking sheet with parchment paper.
- Cut the zucchini into thin, fry-like sticks and set aside.
- In a bowl, combine bread crumbs, Parmesan cheese, garlic powder, salt, and pepper.
- Coat the zucchini sticks with olive oil, then toss them in the bread crumb mixture until fully covered.
- Place the zucchini fries in a single layer on the prepared baking sheet and bake for 20-25 minutes, turning halfway through, until golden brown and crispy.
- For the garlic aioli, mix mayonnaise, minced garlic, and lemon juice in a bowl until smooth.
- Serve the zucchini fries warm with the garlic aioli on the side for dipping. Enjoy!
Spicy Roasted Chickpeas and Veggie Sticks
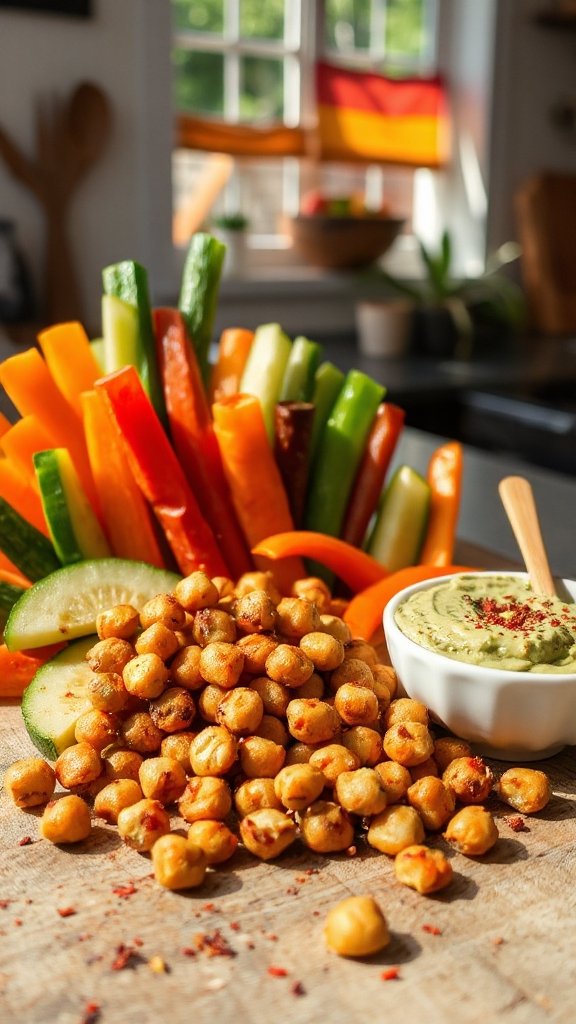
Spicy roasted chickpeas and veggie sticks make for a crunchy and flavorful snack or appetizer that combines the goodness of legumes with fresh vegetables. The chickpeas are seasoned and roasted for a spicy kick, while the veggie sticks add a revitalizing crunch. This combination is not only satisfying but also full of fiber and essential nutrients.
| Ingredients | Quantity |
|---|---|
| Canned chickpeas | 1 can (15 oz), drained and rinsed |
| Olive oil | 2 tablespoons |
| Ground cumin | 1 teaspoon |
| Paprika | 1 teaspoon |
| Cayenne pepper | 1/2 teaspoon |
| Salt | 1/2 teaspoon |
| Carrots | 2, cut into sticks |
| Celery | 2, cut into sticks |
| Bell pepper | 1, cut into sticks |
| Cucumber | 1, cut into sticks |
| Hummus (optional) | For dipping |
Cooking Steps:
- Preheat your oven to 400°F (200°C) and line a baking sheet with parchment paper.
- In a bowl, toss the drained chickpeas with olive oil, cumin, paprika, cayenne, and salt until well coated.
- Spread the chickpeas evenly on the prepared baking sheet and roast for 25-30 minutes, stirring halfway through, until crispy and golden.
- While the chickpeas are roasting, prepare the veggie sticks by cutting the carrots, celery, bell pepper, and cucumber into long, thin strips.
- Once the chickpeas are done, remove them from the oven and let cool slightly.
- Serve the spicy roasted chickpeas warm alongside the fresh veggie sticks and a side of hummus for dipping. Enjoy!
Rainbow Veggie Roll-Ups
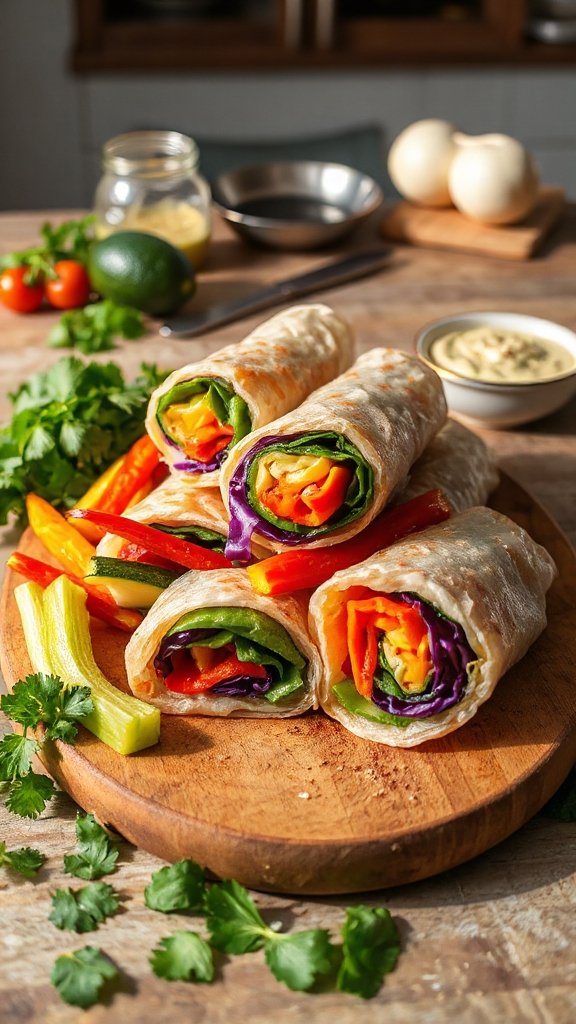
Rainbow Veggie Roll-Ups are a fun and colorful way to enjoy fresh vegetables, making them perfect for a light lunch or a healthy snack. These roll-ups are made with a variety of vibrant veggies wrapped in a large tortilla or lettuce leaf, along with a creamy spread for added flavor. They are not only visually appealing but also packed with nutrients, ensuring every bite is both satisfying and wholesome.
| Ingredients | Quantity |
|---|---|
| Large whole wheat tortillas or large lettuce leaves | 4 (tortillas) or 8 (leaves) |
| Cream cheese or hummus | 1/2 cup |
| Bell pepper (various colors) | 1, sliced thinly |
| Cucumber | 1, julienned |
| Carrot | 1, grated |
| Avocado | 1, sliced or mashed |
| Spinach or mixed greens | 1 cup |
| Salt and pepper | To taste |
Cooking Steps:
- Spread a thin layer of cream cheese or hummus on each tortilla or lettuce leaf.
- Layer the sliced bell pepper, cucumber, grated carrot, avocado, and spinach evenly over the spread.
- Season the veggies with salt and pepper to taste.
- Tightly roll each tortilla or lettuce leaf, starting from one end to the other.
- Slice the roll-ups into bite-sized pieces and serve immediately, or refrigerate for later enjoyment.
Cauliflower Buffalo Bites

Cauliflower Buffalo Bites are a delicious and spicy twist on traditional buffalo wings, perfect for a game day snack or as an appetizer at parties. These bites feature cauliflower florets coated in a zesty buffalo sauce and baked to crispy perfection, making them a healthier alternative that doesn’t skimp on flavor. They are often served with a side of creamy ranch or blue cheese dressing for dipping.
| Ingredients | Quantity |
|---|---|
| Cauliflower florets | 1 head (about 4 cups) |
| All-purpose flour | 1/2 cup |
| Almond milk or any plant-based milk | 1/2 cup |
| Garlic powder | 1 teaspoon |
| Onion powder | 1 teaspoon |
| Salt | 1/2 teaspoon |
| Pepper | 1/4 teaspoon |
| Buffalo sauce | 1/2 cup |
| Olive oil | 1 tablespoon |
Cooking Steps:
- Preheat the oven to 450°F (230°C) and line a baking sheet with parchment paper.
- In a bowl, whisk together the flour, almond milk, garlic powder, onion powder, salt, and pepper until smooth.
- Dip each cauliflower floret into the batter, ensuring it’s well coated, and place it on the prepared baking sheet.
- Bake for 20 minutes until golden and crispy.
- Remove from the oven, drizzle buffalo sauce over the cauliflower bites, and toss to coat.
- Return to the oven for an additional 10-15 minutes until the sauce is heated through and slightly caramelized.
- Serve hot with your choice of dipping sauce.
Sweet Potato Nacho Sticks

Sweet Potato Nacho Sticks are a fun and flavorful twist on traditional nachos, featuring crispy sweet potato sticks topped with all your favorite nacho fixings. Baked instead of fried, these sticks are a healthier alternative that still packs a punch when it comes to taste. Whether you’re enjoying them as a snack, an appetizer at a party, or as a side dish, these nacho sticks are sure to satisfy your cravings.
| Ingredients | Quantity |
|---|---|
| Sweet potatoes | 2 large |
| Olive oil | 2 tablespoons |
| Chili powder | 1 teaspoon |
| Cumin | 1/2 teaspoon |
| Salt | 1/2 teaspoon |
| Pepper | 1/4 teaspoon |
| Shredded cheese (cheddar or your choice) | 1 cup |
| Jalapeños (sliced) | 1/4 cup |
| Avocado (diced) | 1 medium |
| Fresh cilantro (for garnish) | Optional |
| Sour cream or Greek yogurt (for serving) | Optional |
Cooking Steps:
- Preheat the oven to 425°F (220°C) and line a baking sheet with parchment paper.
- Cut sweet potatoes into sticks, about 1/4 inch thick.
- In a bowl, toss sweet potato sticks with olive oil, chili powder, cumin, salt, and pepper until evenly coated.
- Spread the sweet potato sticks in a single layer on the baking sheet and bake for 25-30 minutes, flipping halfway through, until crispy.
- Remove from the oven, sprinkle cheese and jalapeños over the warm sticks, and return to the oven for an additional 5 minutes, until the cheese melts.
- Serve immediately, topped with diced avocado, cilantro, and a side of sour cream or Greek yogurt for dipping.
Beetroot and Goat Cheese Arancini

Beetroot and Goat Cheese Arancini are a delightful fusion of flavors that transform classic risotto into crispy, golden-brown bites. These Italian-inspired rice balls are filled with creamy goat cheese and earthy beetroot, making them a visually stunning and delicious appetizer or snack. Perfect for parties or as a savory treat, they’re sure to impress your guests with their vibrant color and rich taste.
| Ingredients | Quantity |
|---|---|
| Arborio rice | 1 cup |
| Vegetable broth | 3 cups |
| Beetroot (cooked and diced) | 1 cup |
| Goat cheese (crumbled) | 1/2 cup |
| Onion (finely chopped) | 1 small |
| Garlic (minced) | 2 cloves |
| Parmesan cheese (grated) | 1/4 cup |
| Eggs | 2 large |
| All-purpose flour | 1/2 cup |
| Breadcrumbs | 1 cup |
| Olive oil (for frying) | As needed |
| Salt | To taste |
| Pepper | To taste |
| Fresh herbs (for garnish) | Optional |
Cooking Steps:
- In a saucepan, heat the vegetable broth and keep it warm.
- In a separate skillet, sauté the onion and garlic in olive oil until translucent, then add the Arborio rice and toast for a couple of minutes.
- Gradually add the warm broth, stirring frequently, until the rice is creamy and cooked through; incorporate the diced beetroot and Parmesan cheese.
- Allow the mixture to cool, then mix in the eggs and season with salt and pepper.
- Once cooled, scoop out small portions, fill with goat cheese, and roll into balls.
- Dredge each ball in flour, then dip in beaten eggs, and coat with breadcrumbs.
- Heat olive oil in a pan and fry the arancini until golden brown, about 3-4 minutes per side.
- Drain on paper towels and serve warm, garnished with fresh herbs if desired.
Cucumber Boats With Hummus

Cucumber Boats with Hummus are a revitalizing and healthy appetizer or snack that brings together the crispness of cucumbers and the creamy texture of hummus. These bite-sized treats are not only visually appealing but also packed with flavor and nutrition, making them a perfect choice for parties, picnics, or simply as a light snack for yourself.
| Ingredients | Quantity |
|---|---|
| Cucumbers | 2 large |
| Hummus | 1 cup |
| Cherry tomatoes | 1/2 cup, halved |
| Bell pepper | 1 small, diced |
| Fresh parsley | 2 tablespoons, chopped |
| Olive oil | 1 tablespoon |
| Salt | To taste |
| Pepper | To taste |
Cooking Steps:
- Slice the cucumbers in half lengthwise and scoop out the seeds to create “boats.”
- In a bowl, mix the hummus with diced bell pepper, halved cherry tomatoes, olive oil, salt, and pepper.
- Spoon the hummus mixture evenly into each cucumber boat.
- Garnish with chopped parsley before serving. Enjoy!
Crunchy Veggie Sushi
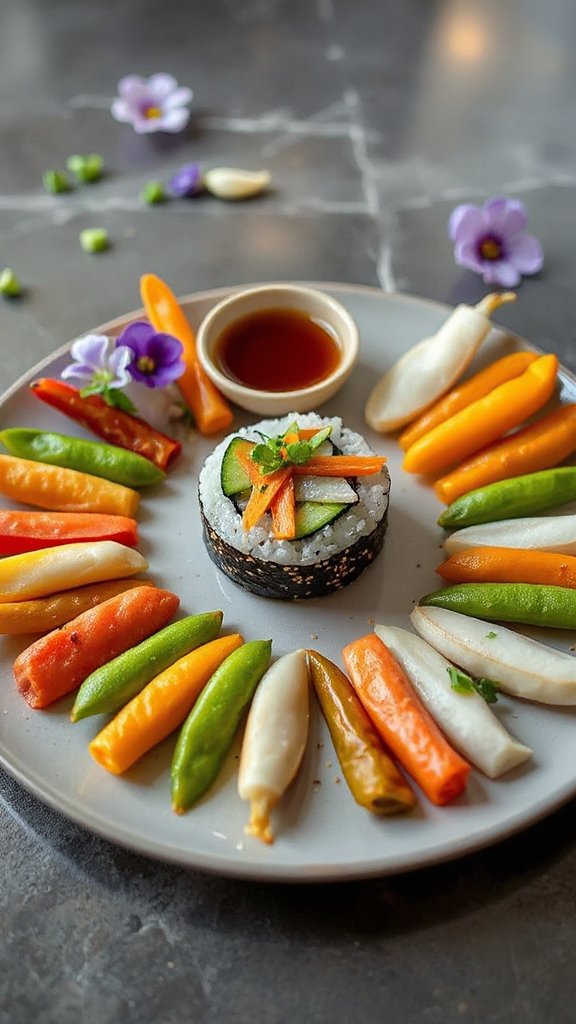
Crunchy Veggie Sushi is a vibrant and fun dish that combines fresh vegetables and sushi rice wrapped in seaweed sheets for a delightful, healthy meal option. These colorful rolls are perfect for satisfying your sushi cravings without the seafood and make for an excellent appetizer or lunch that’s both nutritious and delicious.
| Ingredients | Quantity |
|---|---|
| Sushi rice | 1 cup |
| Nori sheets | 4 sheets |
| Carrot | 1 medium, julienned |
| Cucumber | 1 small, julienned |
| Avocado | 1 ripe, sliced |
| Bell pepper | 1 small, thinly sliced |
| Cream cheese | 1/2 cup |
| Rice vinegar | 2 tablespoons |
| Soy sauce | For serving |
| Sesame seeds | For garnish |
Cooking Steps:
- Cook the sushi rice according to package instructions; mix with rice vinegar once cooked and let it cool.
- Lay a nori sheet on a bamboo sushi mat, shiny side down.
- Spread a thin layer of sushi rice evenly over the nori, leaving a 1-inch border at the top.
- Arrange julienned carrots, cucumber, avocado, and bell pepper in a line across the rice.
- Spread a thin layer of cream cheese on top of the vegetables for added creaminess.
- Roll the sushi tightly from the bottom using the sushi mat while applying gentle pressure, then seal the edge with a little water.
- Slice into bite-sized pieces and garnish with sesame seeds. Serve with soy sauce for dipping. Enjoy!
Herbed Yogurt Dip With Veggie Platter
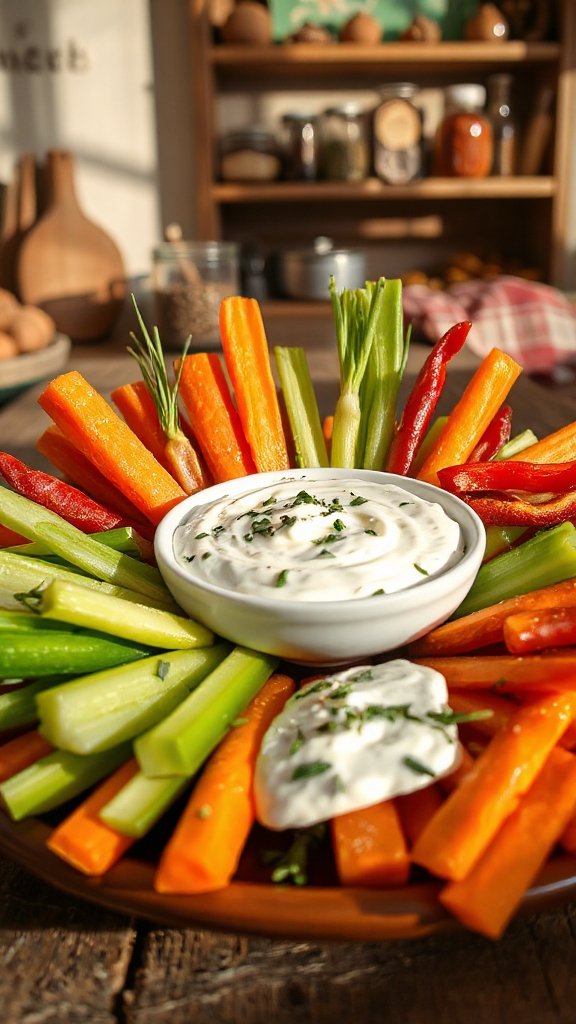
Herbed Yogurt Dip with Veggie Platter is a revitalizing and healthy appetizer that beautifully complements a variety of fresh vegetables. This dip is creamy and packed with flavor from a blend of fresh herbs and spices, making it a perfect accompaniment for any gathering or a quick snack. Serve it alongside a colorful assortment of crunchy veggie sticks for a light and nutritious treat.
| Ingredients | Quantity |
|---|---|
| Greek yogurt | 1 cup |
| Fresh dill, chopped | 2 tablespoons |
| Fresh parsley, chopped | 2 tablespoons |
| Fresh chives, chopped | 1 tablespoon |
| Garlic powder | 1 teaspoon |
| Lemon juice | 1 tablespoon |
| Salt | To taste |
| Black pepper | To taste |
| Assorted veggies (carrots, cucumbers, bell peppers, celery) | As desired |
Cooking Steps:
- In a mixing bowl, combine Greek yogurt, dill, parsley, chives, garlic powder, lemon juice, salt, and black pepper.
- Stir the mixture until well combined and adjust seasoning to taste.
- Slice assorted vegetables into sticks and arrange them on a platter.
- Serve the herbed yogurt dip in the center of the vegetable platter for dipping. Enjoy!
Mini Veggie Tacos

Mini Veggie Tacos are a fun and vibrant twist on traditional tacos, allowing you to enjoy a healthy and colorful mix of fresh vegetables in a delightful handheld bite. Perfect for parties, snacks, or as a light meal, these mini treats are packed with flavor and are highly customizable to suit your taste preferences.
| Ingredients | Quantity |
|---|---|
| Mini corn tortillas | 8 pieces |
| Canned black beans, rinsed | 1 cup |
| Corn kernels | 1 cup |
| Diced tomatoes | 1 cup |
| Chopped red onion | ½ cup |
| Fresh cilantro, chopped | ¼ cup |
| Lime juice | 2 tablespoons |
| Avocado, sliced | 1 (optional) |
| Salt | To taste |
| Black pepper | To taste |
Cooking Steps:
- In a mixing bowl, combine black beans, corn, diced tomatoes, red onion, cilantro, lime juice, salt, and black pepper. Mix well.
- Heat mini corn tortillas in a dry skillet over medium heat for about 30 seconds on each side until warm and pliable.
- Spoon the veggie mixture onto each tortilla.
- Top with sliced avocado if desired.
- Serve immediately and enjoy your delicious mini veggie tacos!
Teriyaki Glazed Brussels Sprout Sticks
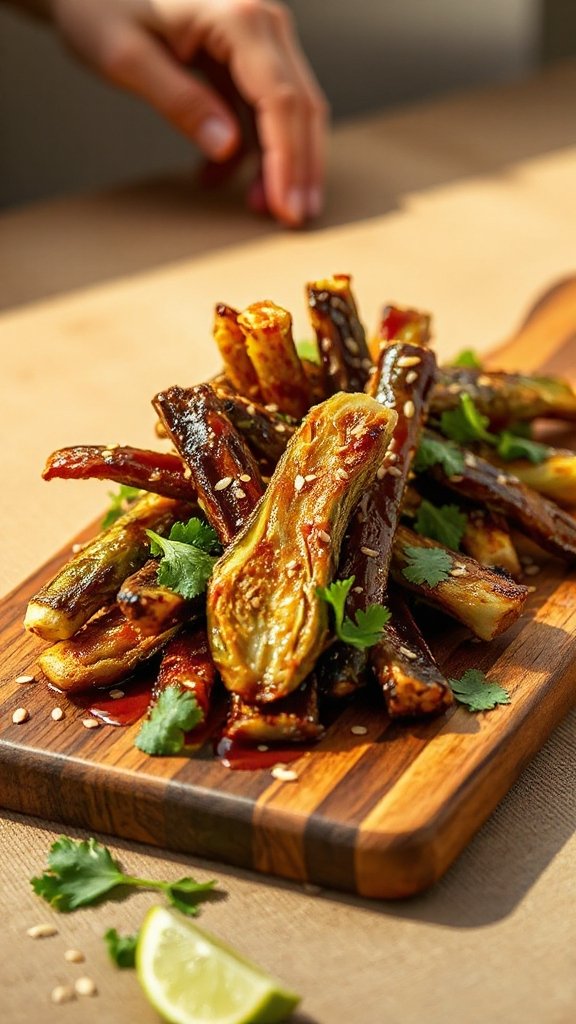
Teriyaki Glazed Brussels Sprout Sticks are a delicious and healthy appetizer that brings a sweet and savory flair to your veggie stick experience. They are perfect for parties, as a side dish, or simply as a unique snack. The caramelized Brussels sprouts, coated in a rich teriyaki glaze, create a satisfying crunch with every bite, making these sticks a crowd-pleaser for both veggie lovers and skeptics alike.
| Ingredients | Quantity |
|---|---|
| Brussels sprouts, trimmed and halved | 1 lb (450g) |
| Olive oil | 2 tablespoons |
| Salt and pepper | To taste |
| Teriyaki sauce | ¼ cup |
| Sesame seeds | 1 tablespoon |
| Green onions, sliced (for garnish) | 2 stalks |
Cooking Steps:
- Preheat your oven to 400°F (200°C) and line a baking sheet with parchment paper.
- In a bowl, toss the halved Brussels sprouts with olive oil, salt, and pepper until they are well coated.
- Spread the Brussels sprouts on the baking sheet in a single layer and roast for 20-25 minutes, or until they are golden brown and crispy.
- Drizzle the teriyaki sauce over the roasted Brussels sprouts and toss to coat. Return to the oven for an additional 5 minutes.
- Remove from the oven, sprinkle with sesame seeds and sliced green onions before serving. Enjoy your Teriyaki Glazed Brussels Sprout Sticks!