
As an Amazon Associate I earn from qualifying purchases.
Editorial Policy | Disclosure Policy
Mini Pita Pockets With Hummus and Veggies

Mini pita pockets filled with hummus and fresh veggies make for a delicious and healthy lunchbox filler. These bite-sized treats are not only easy to prepare but also customizable, allowing for a variety of fillings to cater to different tastes. They are perfect for kids and adults alike, providing a nutritious option that’s fun to eat.
| Ingredients | Quantity |
|---|---|
| Mini pita pockets | 6-8 pieces |
| Hummus | 1 cup |
| Cucumber, thinly sliced | 1 cup |
| Carrots, grated | 1 cup |
| Red bell pepper, diced | 1/2 cup |
| Spinach leaves | 1 cup |
| Olive oil (optional) | Drizzle |
| Salt and pepper (to taste) | To taste |
Cooking Steps:
- Slice mini pita pockets in half to create small pockets.
- Spread a generous amount of hummus inside each pita pocket.
- Fill the pockets with a mix of cucumber, carrots, red bell pepper, and spinach.
- Drizzle olive oil and sprinkle salt and pepper over the veggies, if desired.
- Serve immediately or pack in an airtight container for lunch.
DIY Sushi Rolls
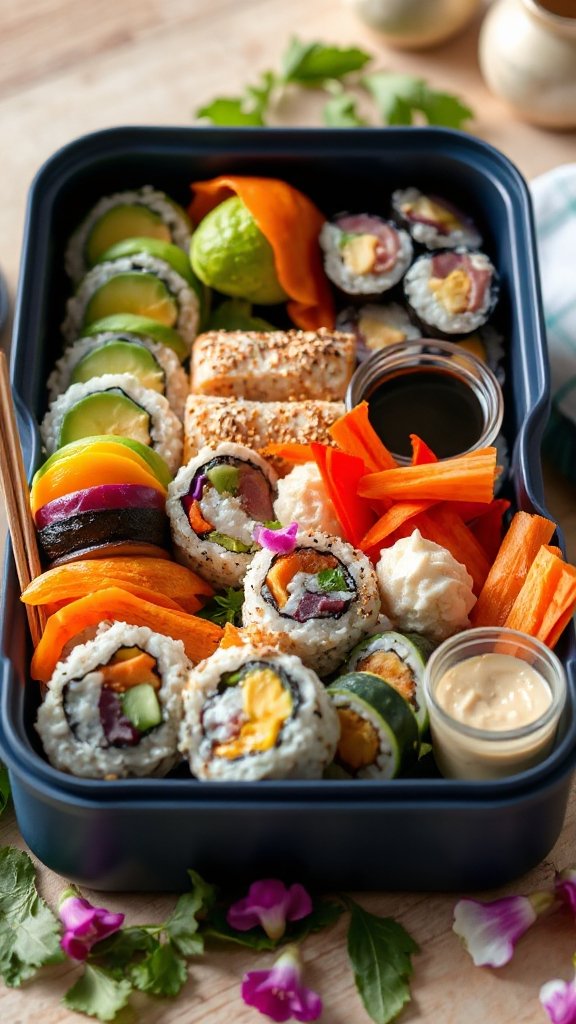
DIY sushi rolls are a fun and nutritious lunchbox option that kids and adults can enjoy. These handheld wraps are not only customizable according to personal taste but also a great way to incorporate various ingredients, including vegetables and protein. Making sushi at home can also be a fun activity for families, promoting creativity and teamwork in the kitchen.
| Ingredients | Quantity |
|---|---|
| Sushi rice | 2 cups |
| Nori sheets (seaweed) | 4-6 sheets |
| Rice vinegar | 2 tablespoons |
| Cucumber, julienned | 1 cup |
| Carrots, julienned | 1 cup |
| Avocado, sliced | 1 large |
| Cooked shrimp or crab sticks | 1 cup |
| Soy sauce (for dipping) | To taste |
| Sesame seeds (optional) | To taste |
Cooking Steps:
- Rinse sushi rice in cold water until the water runs clear, then cook according to package instructions.
- Once cooked, mix the rice with rice vinegar and allow to cool slightly.
- Lay a nori sheet on a bamboo sushi mat, and spread an even layer of sushi rice over the nori, leaving a small border at the top.
- Arrange julienned cucumber, carrots, avocado, and shrimp or crab sticks in a line across the rice.
- Roll the sushi tightly using the mat, and seal the edge with a little water.
- Slice the roll into bite-sized pieces and serve with soy sauce for dipping.
Colorful Salad Jars
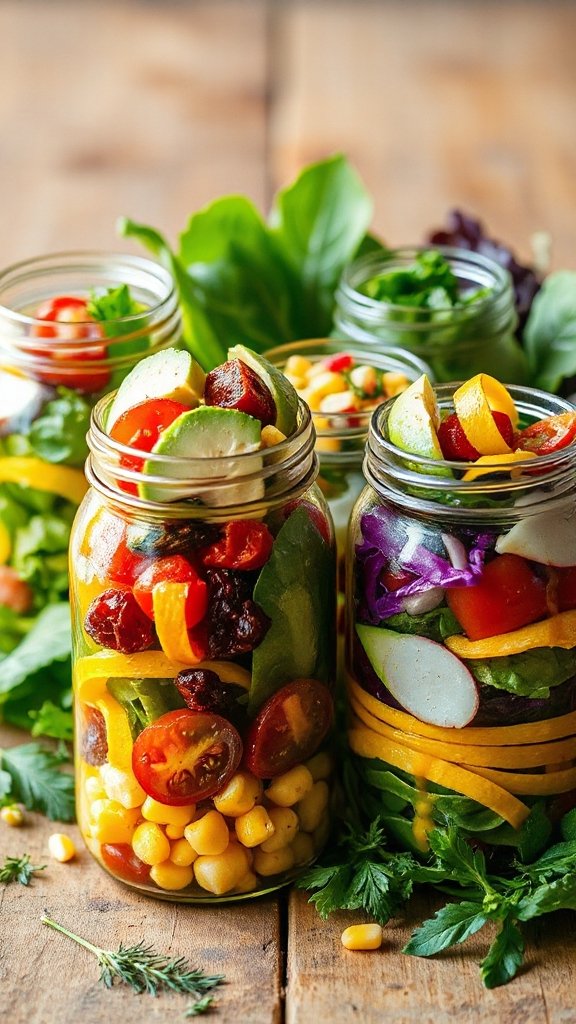
Colorful salad jars are a delightful and visually appealing lunchbox option that makes healthy eating fun! These salad jars can be prepped in advance and feature layers of vibrant vegetables, grains, and proteins, allowing for a satisfying and nutritious meal. The layered presentation keeps ingredients fresh and crunchy, making them perfect for on-the-go lunches.
| Ingredients | Quantity |
|---|---|
| Mason jars | 4 (16 oz) |
| Mixed greens (spinach, kale, etc.) | 4 cups |
| Cherry tomatoes, halved | 1 cup |
| Cucumber, diced | 1 cup |
| Bell pepper, diced | 1 cup |
| Shredded carrots | 1 cup |
| Chickpeas or black beans | 1 can (15 oz), drained |
| Quinoa or couscous | 1 cup (cooked) |
| Feta cheese, crumbled | 1 cup |
| Olive oil | 4 tablespoons |
| Balsamic vinegar | 4 tablespoons |
| Salt & pepper | To taste |
Cooking Steps:
- Begin by cooking the quinoa or couscous according to package instructions and allow it to cool.
- In each mason jar, layer the ingredients starting with the dressing at the bottom (olive oil and balsamic vinegar), followed by hearty ingredients like chickpeas or black beans, then the quinoa/couscous.
- Continue layering with the diced bell pepper, cucumber, cherry tomatoes, shredded carrots, and finally top with mixed greens.
- Seal the jars and keep them refrigerated until ready to serve. Shake well before enjoying!
Pasta Salad With Fun Shapes
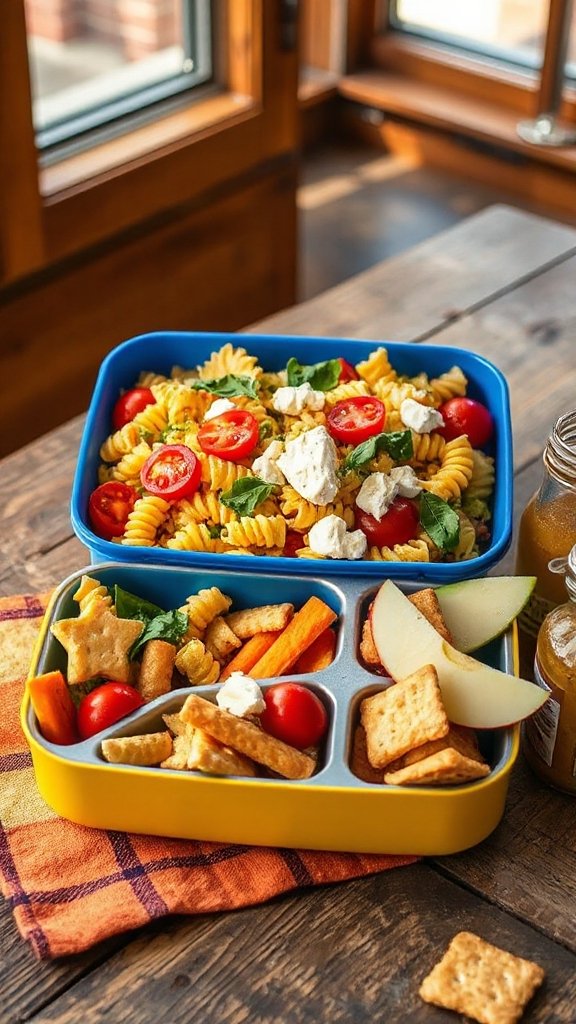
Pasta salad with fun shapes is a playful and nutritious dish perfect for lunchboxes, providing a delightful mix of textures and flavors that kids will love. This colorful salad can be prepared ahead of time and is versatile enough to include a variety of vegetables and proteins, making it not just appealing but also wholesome.
| Ingredients | Quantity |
|---|---|
| Fun-shaped pasta | 2 cups (dry) |
| Cherry tomatoes, halved | 1 cup |
| Cucumber, diced | 1 cup |
| Bell pepper, diced | 1 cup |
| Black olives, sliced | 1/2 cup |
| Mozzarella balls | 1 cup |
| Fresh basil leaves | 1/4 cup, chopped |
| Olive oil | 1/4 cup |
| Red wine vinegar | 2 tablespoons |
| Salt | To taste |
| Pepper | To taste |
Cooking Steps:
- Cook the fun-shaped pasta according to package instructions until al dente, then drain and rinse under cold water to cool.
- In a large bowl, combine the cooked pasta, cherry tomatoes, cucumber, bell pepper, black olives, mozzarella balls, and chopped basil.
- In a small bowl, whisk together olive oil, red wine vinegar, salt, and pepper, then pour it over the pasta salad.
- Toss gently to combine all ingredients well and guarantee even coating with the dressing.
- Refrigerate for at least 30 minutes before serving to let the flavors meld. Enjoy it chilled or at room temperature!
Cheese and Crackers Fun Pack
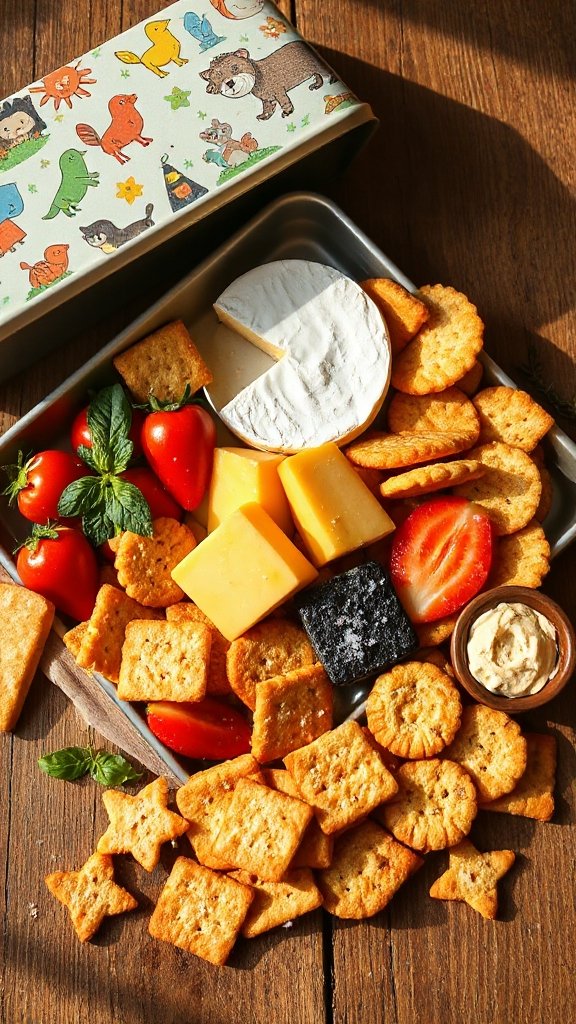
Cheese and crackers fun pack is a simple yet delightful lunchbox filler that offers a satisfying crunch and creamy goodness, making it a hit with kids and adults alike. This combo is highly customizable, allowing you to select different types of cheeses, crackers, and even add some extras like fruits or veggies for a balanced meal.
| Ingredients | Quantity |
|---|---|
| Assorted cheese slices | 8 ounces |
| Variety of crackers | 1 box (about 4-6 ounces) |
| Grapes or apple slices | 1 cup |
| Baby carrots | 1 cup |
| Hummus or ranch dip | 1/2 cup |
Cooking Steps:
- Prepare the cheese by slicing it into bite-sized pieces.
- Arrange the assorted crackers in a section of the lunchbox or container.
- Add the cheese slices on top or beside the crackers.
- Include grapes or apple slices and baby carrots in separate sections of the lunchbox.
- Pack hummus or ranch dip in a small container for a flavorful addition to the veggies. Enjoy this fun, no-cook lunch!
Fruit Kabobs
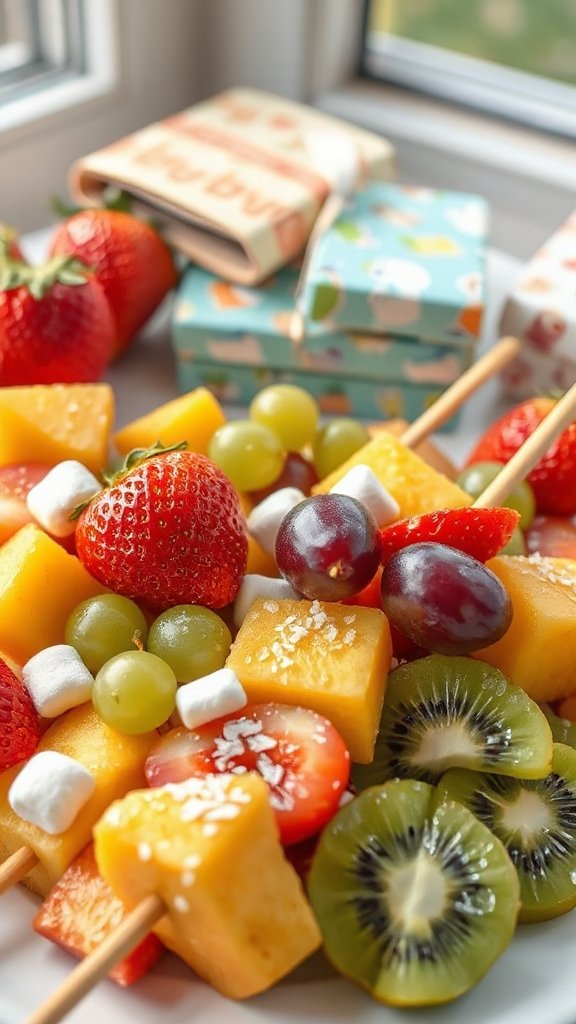
Fruit kabobs are a colorful and fun way to pack vitamins and love into your child’s lunchbox. These skewers of fresh fruit not only provide a deliciously sweet treat but can also add a bright, cheerful touch to lunchtime. They can be customized with your child’s favorite fruits, making them an exciting snack that can be enjoyed at home or on-the-go.
| Ingredients | Quantity |
|---|---|
| Strawberries | 1 cup |
| Pineapple chunks | 1 cup |
| Grapes | 1 cup |
| Banana | 1 large |
| Melon (cantaloupe or honeydew) | 1 cup |
| Skewers | 6-8 (depending on size) |
Cooking Steps:
- Wash all the fruits thoroughly and pat them dry.
- Cut the strawberries in half, slice the banana, and cube the melon into bite-sized pieces.
- On each skewer, thread the pieces of fruit in a colorful pattern.
- Alternate the fruits for a visually appealing display.
- Once assembled, store them in a lunchbox or airtight container for a rejuvenating, nutritious snack. Enjoy!
Smoothie Muffins
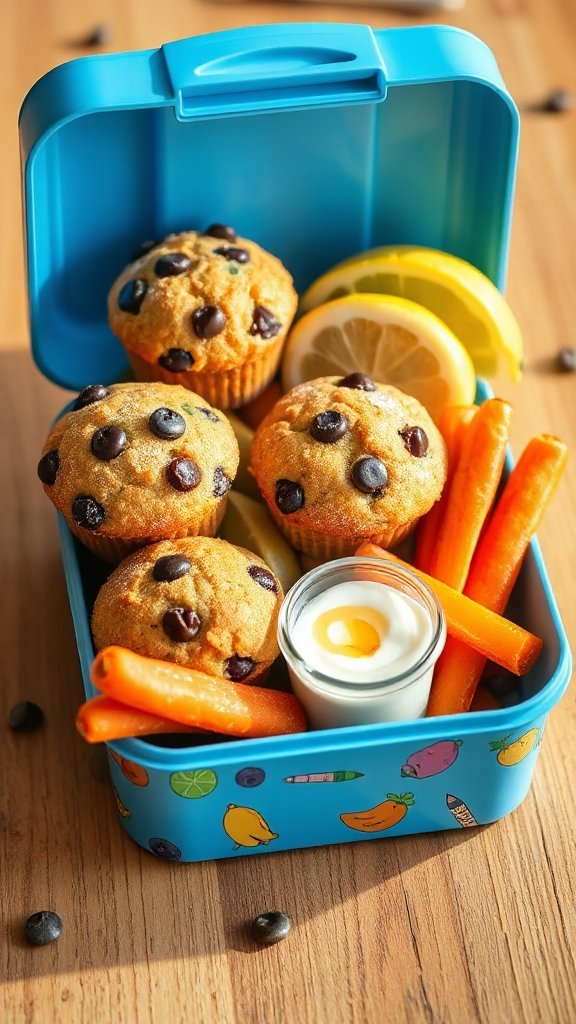
Smoothie muffins are a delightful and nutritious option for school lunches, combining the goodness of fruits and vegetables into a portable treat. These muffins are moist and fluffy, perfect for kids who love smoothies but need a quick snack for the day. Packed with flavor and nutrients, they are a great way to provide your child with a wholesome meal while also indulging their taste buds.
| Ingredients | Quantity |
|---|---|
| All-purpose flour | 2 cups |
| Baking powder | 1 tablespoon |
| Baking soda | 1/2 teaspoon |
| Salt | 1/4 teaspoon |
| Honey or maple syrup | 1/2 cup |
| Eggs | 2 large |
| Greek yogurt | 1 cup |
| Milk | 1/2 cup |
| Mixed frozen berries | 1 cup |
| Spinach (fresh or frozen) | 1/2 cup |
| Vanilla extract | 1 teaspoon |
Cooking Steps:
- Preheat the oven to 350°F (175°C) and line a muffin tin with paper liners.
- In a large bowl, whisk together the flour, baking powder, baking soda, and salt.
- In another bowl, combine the honey (or maple syrup), eggs, Greek yogurt, milk, and vanilla extract, mixing until well blended.
- Gradually add the wet ingredients into the dry ingredients, stirring just until combined. Fold in the mixed berries and spinach.
- Divide the batter evenly among the muffin cups.
- Bake for 18-20 minutes or until a toothpick inserted into the center comes out clean.
- Allow them to cool before storing in a lunchbox or airtight container. Enjoy your tasty and nutritious smoothie muffins!
Quesadilla Triangles
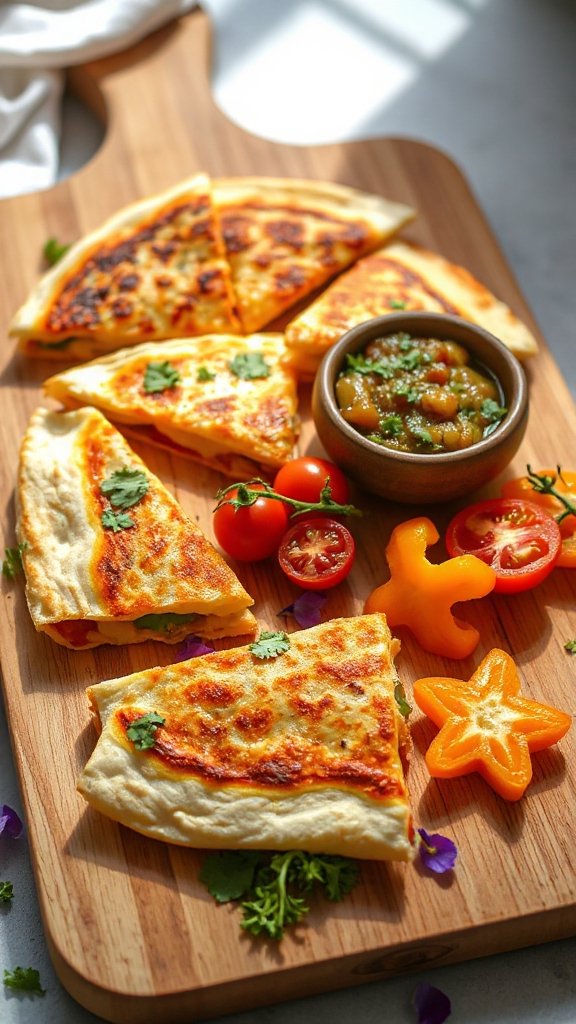
Quesadilla triangles are a fun and versatile meal option perfect for school lunches. Easy to make and pack, these cheesy delights can be filled with a variety of ingredients such as vegetables, proteins, and different cheeses, making them both satisfying and nutritious. Kids love them for their gooeyness and crispy texture, and they can be enjoyed warm or at room temperature.
| Ingredients | Quantity |
|---|---|
| Flour tortillas | 4 large |
| Shredded cheese (cheddar, mozzarella) | 2 cups |
| Cooked chicken (optional) | 1 cup |
| Bell peppers (sliced) | 1 cup |
| Onion (sliced) | 1/2 medium |
| Olive oil | 2 tablespoons |
| Salsa | For dipping |
| Salt | To taste |
| Black beans (optional) | 1 cup |
Cooking Steps:
- Heat olive oil in a skillet over medium heat and sauté the onion and bell peppers until softened.
- Take one tortilla and sprinkle half of it with cheese. Layer on the cooked chicken and any additional fillings (like black beans) then top with more cheese.
- Fold the tortilla in half and place it in the hot skillet. Cook for 2-3 minutes on each side, or until golden and the cheese is melted.
- Remove from skillet and cut into triangles. Repeat with remaining tortillas and ingredients.
- Allow to cool slightly before packing in lunchboxes. Serve with salsa for dipping if desired. Enjoy your tasty quesadilla triangles!
Yogurt Parfaits
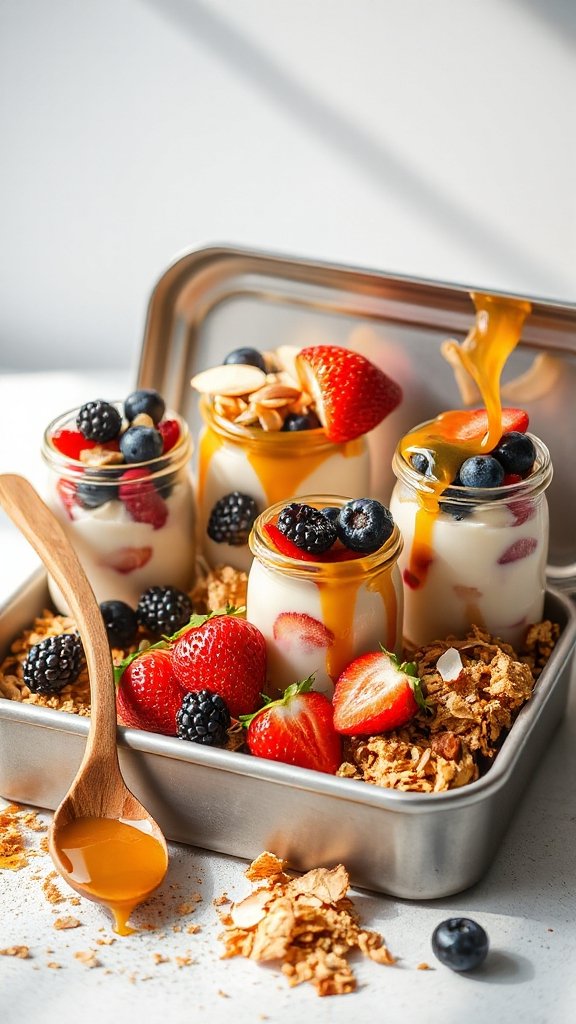
Yogurt parfaits are a delicious and healthy option for school lunches, combining layers of creamy yogurt, fresh fruit, and crunchy granola. They are customizable, easy to prepare, and can be made in advance, making them a perfect choice for busy parents. The colorful presentation also appeals to kids, making it a fun way to enjoy nutritious ingredients.
| Ingredients | Quantity |
|---|---|
| Yogurt (plain or flavored) | 2 cups |
| Granola | 1 cup |
| Fresh berries (strawberries, blueberries, raspberries) | 1 cup |
| Honey or maple syrup (optional) | To taste |
| Sliced banana (optional) | 1 banana |
| Chopped nuts (optional) | 1/4 cup |
Cooking Steps:
- In a cup or bowl, layer yogurt at the bottom.
- Add a layer of granola followed by a layer of mixed fresh berries and bananas if using.
- Drizzle with honey or maple syrup if desired.
- Repeat the layering process until all ingredients are used, finishing with a layer of yogurt on top.
- Serve immediately or cover and store in the refrigerator until ready to pack in lunchboxes. Enjoy your healthy yogurt parfaits!
Homemade Pizza Bites
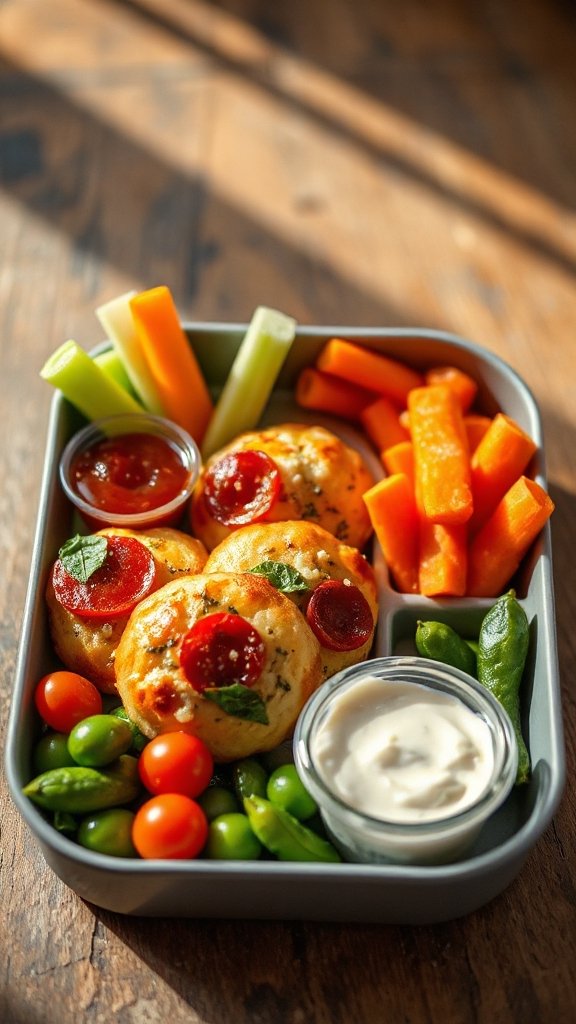
Homemade pizza bites are a fun and tasty way to make lunch exciting for kids. They are bite-sized snacks that combine all the classic flavors of pizza, making them perfect for dipping in marinara sauce or serving with a side of fresh veggies. Easy to prepare, these pizza bites can be made ahead of time and offer a delightful twist to the typical lunchbox options.
| Ingredients | Quantity |
|---|---|
| Pizza dough (store-bought or homemade) | 1 lb |
| Shredded mozzarella cheese | 1 cup |
| Pepperedoni slices or diced vegetables (bell peppers, mushrooms, etc.) | 1 cup |
| Pizza sauce | 1/2 cup |
| Italian seasoning | 1 tsp |
| Olive oil | 1 tbsp |
| Grated Parmesan cheese (optional) | 1/4 cup |
Cooking Steps:
- Preheat the oven to 400°F (200°C).
- Roll out the pizza dough on a floured surface and cut it into small squares (about 2×2 inches).
- Place a small spoonful of pizza sauce, cheese, and choice of pepperoni or vegetables in the center of each dough square.
- Fold the dough over to create a pocket and pinch the edges to seal.
- Brush the tops with olive oil and sprinkle with Italian seasoning and Parmesan, if using.
- Bake in the preheated oven for about 12-15 minutes, or until golden and cooked through.
- Allow to cool slightly before packing into lunchboxes, and serve with extra pizza sauce for dipping. Enjoy your homemade pizza bites!
Energy Bites for a Quick Snack

Energy bites are a fantastic option for quick snacks that are both nutritious and satisfying. These no-bake snacks are packed with wholesome ingredients like oats, nut butter, and honey, making them perfect for packing in lunchboxes or grabbing on-the-go. They’re customizable and can include a variety of add-ins such as chocolate chips or dried fruits, ensuring that kids have a delicious and energizing treat.
| Ingredients | Quantity |
|---|---|
| Rolled oats | 1 cup |
| Nut butter (peanut, almond, etc.) | 1/2 cup |
| Honey or maple syrup | 1/3 cup |
| Chia seeds | 2 tbsp |
| Ground flaxseed | 2 tbsp |
| Mini chocolate chips (optional) | 1/4 cup |
| Dried fruit (raisins, cranberries, etc.) (optional) | 1/4 cup |
| Vanilla extract | 1 tsp |
Cooking Steps:
- In a large bowl, combine rolled oats, nut butter, honey, chia seeds, and ground flaxseed.
- Mix thoroughly until all ingredients are well incorporated.
- If desired, stir in mini chocolate chips or dried fruit for added flavor and texture.
- Refrigerate the mixture for about 30 minutes to make it easier to handle.
- Once chilled, roll the mixture into small balls (about 1 inch in diameter).
- Store the energy bites in an airtight container in the refrigerator for up to one week. Enjoy these delicious snacks anytime!